Frequently asked questions

Everything about SmartUs Photo Sync: getting started, uploading and downloading, the main folder and albums, synchronization, access purchases and payments.

Getting started

What SmartUs Photo Sync does

SmartUs Photo Sync synchronizes folders on your computer with your albums in Google Photos. You choose one main folder; each folder inside it is one album. Synchronization works in both directions:

  • Take into Google Photos: your folders decide what the albums contain. New photos and videos are uploaded; files already in your Google Photos are only added to the album.
  • Take out of Google Photos: your albums decide what the folders contain. Missing photos and videos are downloaded into the matching folders as original files.
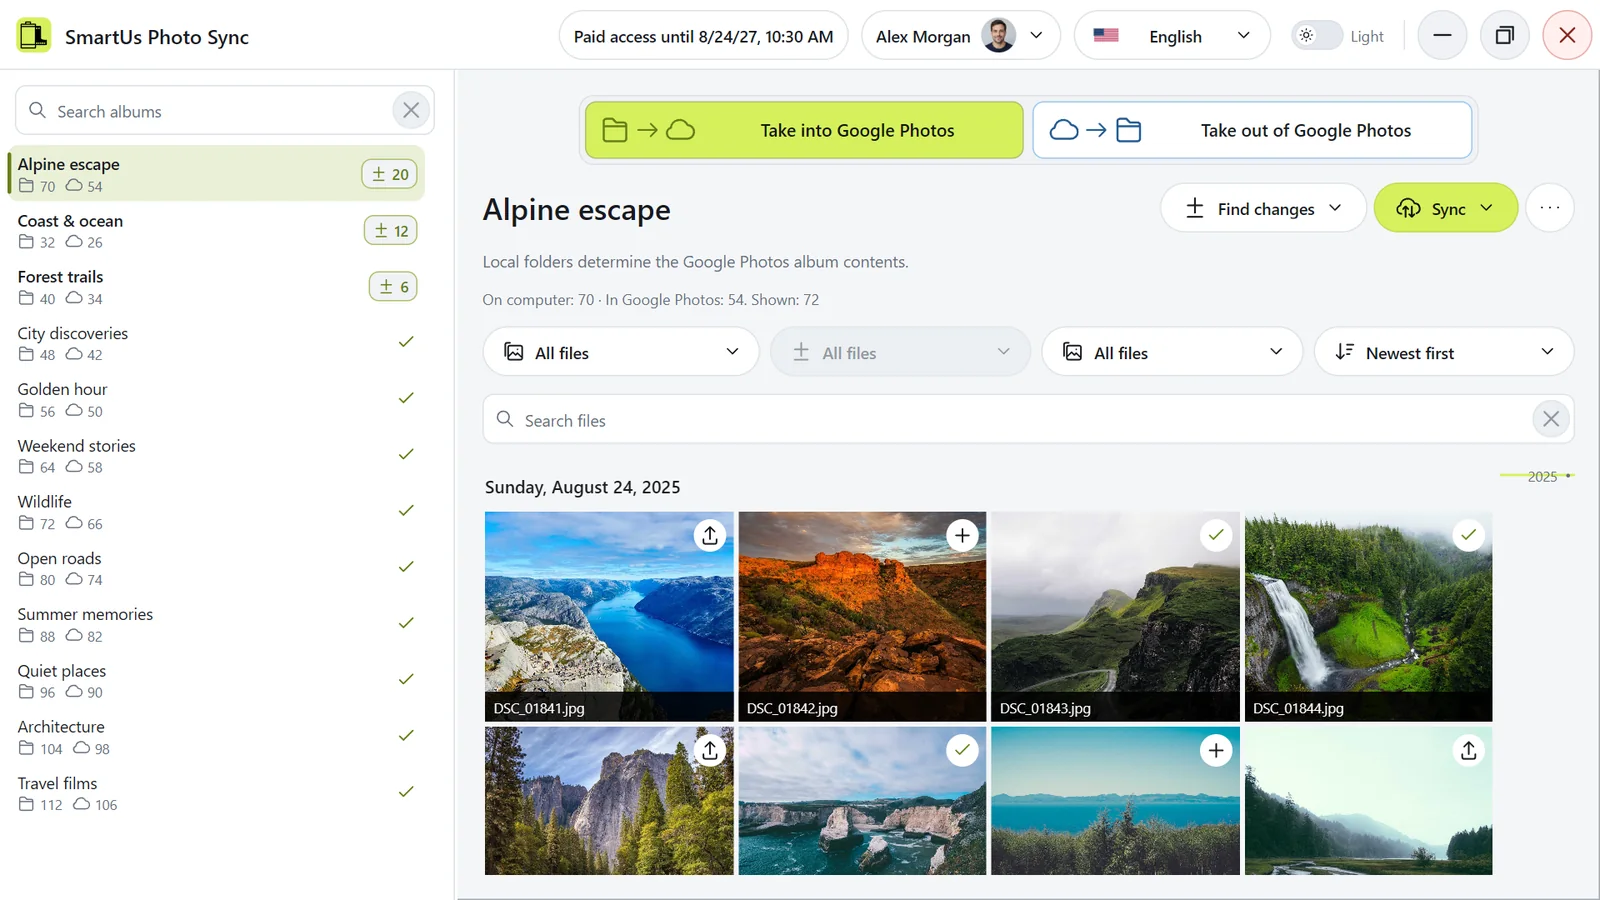
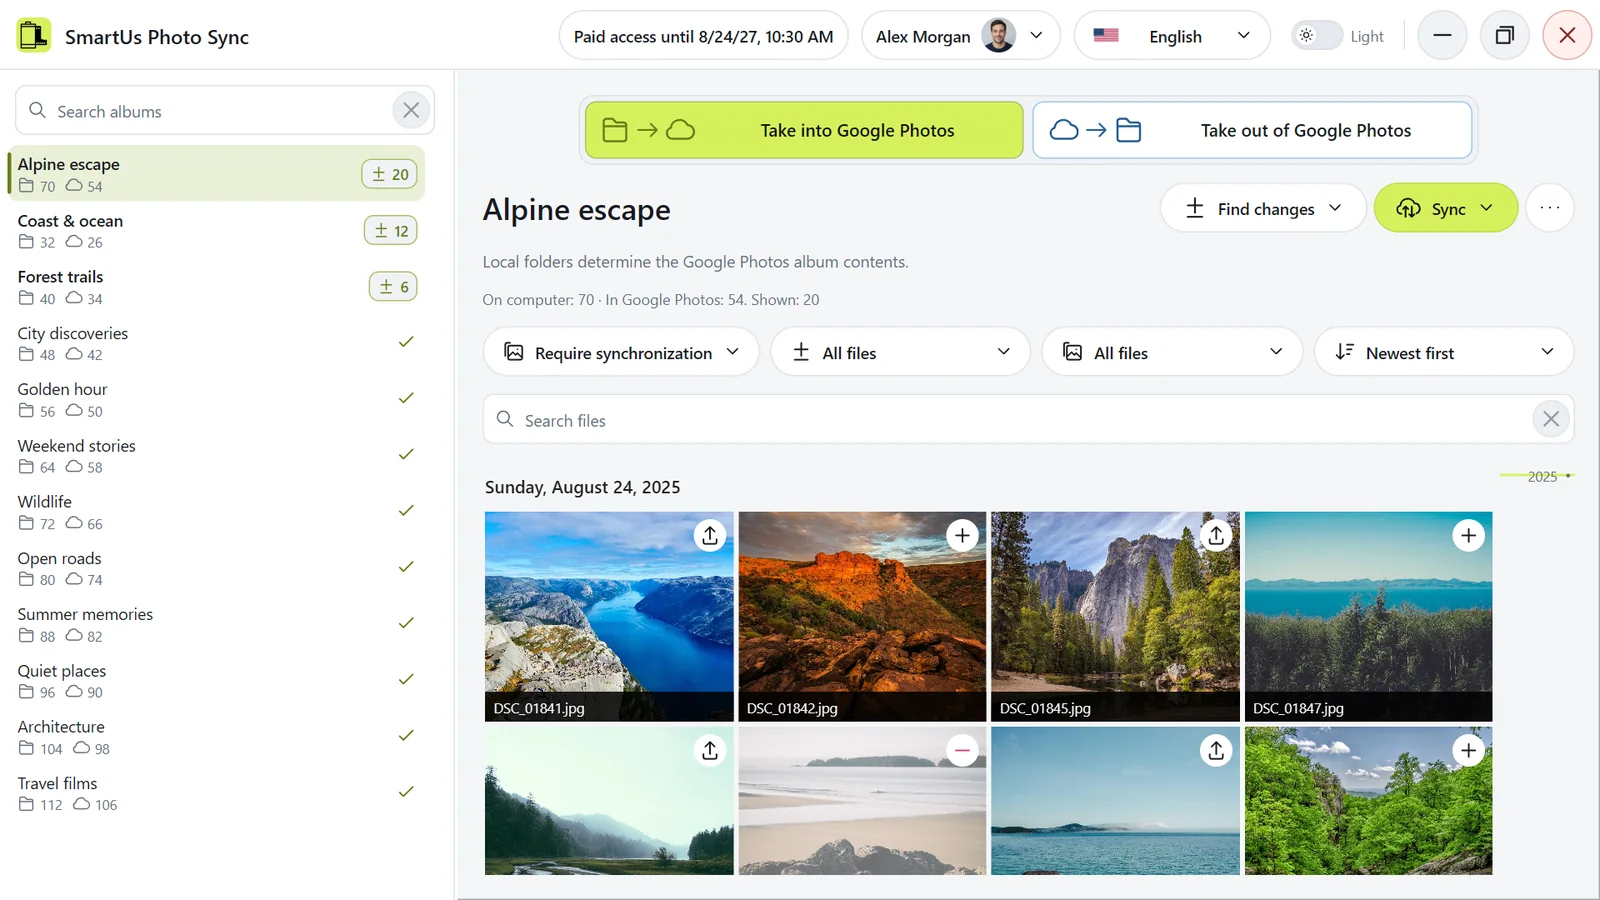
The main window: albums on the left, the direction switch at the top, files in the middle.
The main window: albums on the left, the direction switch at the top, files in the middle. Illustration of the application with demonstration data.

How it works

  1. You choose the main folder. It can be on an internal or external drive, a USB drive, a network folder or a NAS.
  2. You select the direction and click Find changes. The application compares each folder with its Google Photos album and prepares a plan.
  3. You review the plan and click Sync. Only then does anything change.

Important to know

  • Nothing happens automatically. Every change starts only after you click a button and confirm.
  • Files are matched by their content, not their names. A file that is already in place is not uploaded or downloaded again.
  • The application never deletes photos or videos from your Google Photos library. At most it removes a file from an album or deletes an album; the files stay in your library. See Can it delete my photos in Google Photos?
  • In Take out of Google Photos, the application deletes photos and videos from a folder when they are no longer in its album. See Will my files on the computer change?
How do I install the application on Windows?

Download the installer in the Download section, then follow these steps:

  1. Open the downloaded file

    It appears in your browser’s downloads.

  2. Install the application

    Allow the installer to make changes with Yes. Choose the language and click OK, then Next >, Install and Finish. The application starts from the desktop shortcut or the Start menu.

Note: installation may pause

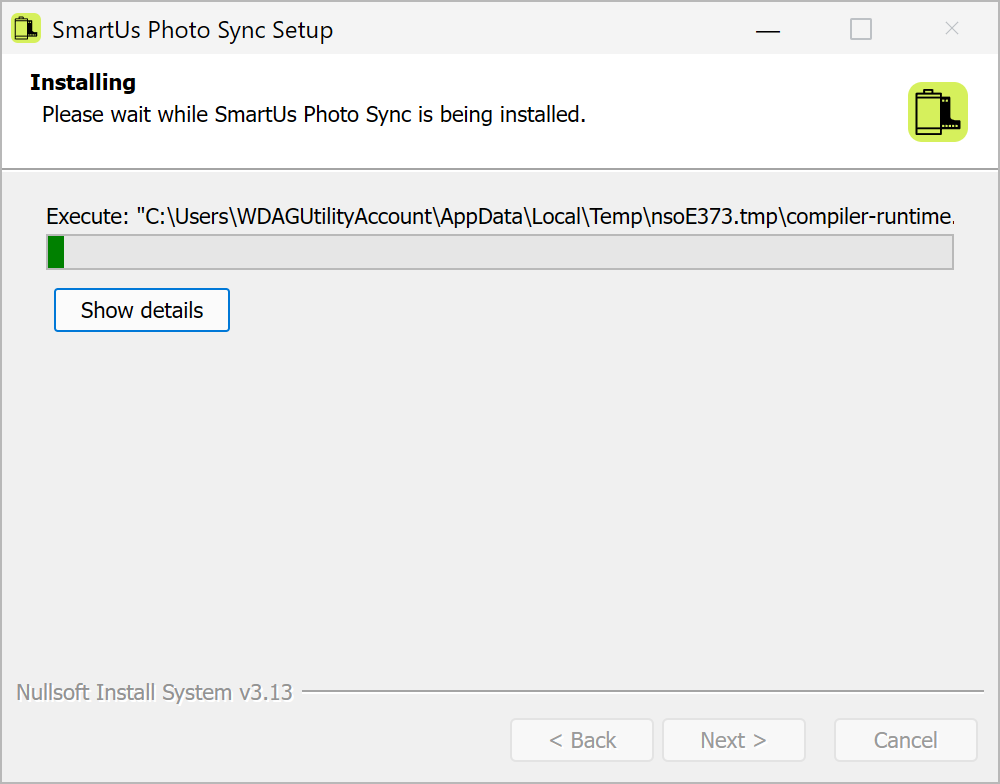
On the first installation, the progress bar may pause for a few minutes while Windows installs a required component. If no error appears, leave the installer open; do not cancel or start it again. In some versions of Windows Sandbox, a known issue with Smart App Control can cause this delay.

Illustration of the installer while Windows installs a required component.

Quick start: your first synchronization

1. Connect Google Photos

On the welcome screen click Connect to Google Photos. Read the notice, tick its checkbox and click Connect to Google Photos again. Sign in to Google in the window that opens. More: Connect Google Photos.

2. Choose the main folder

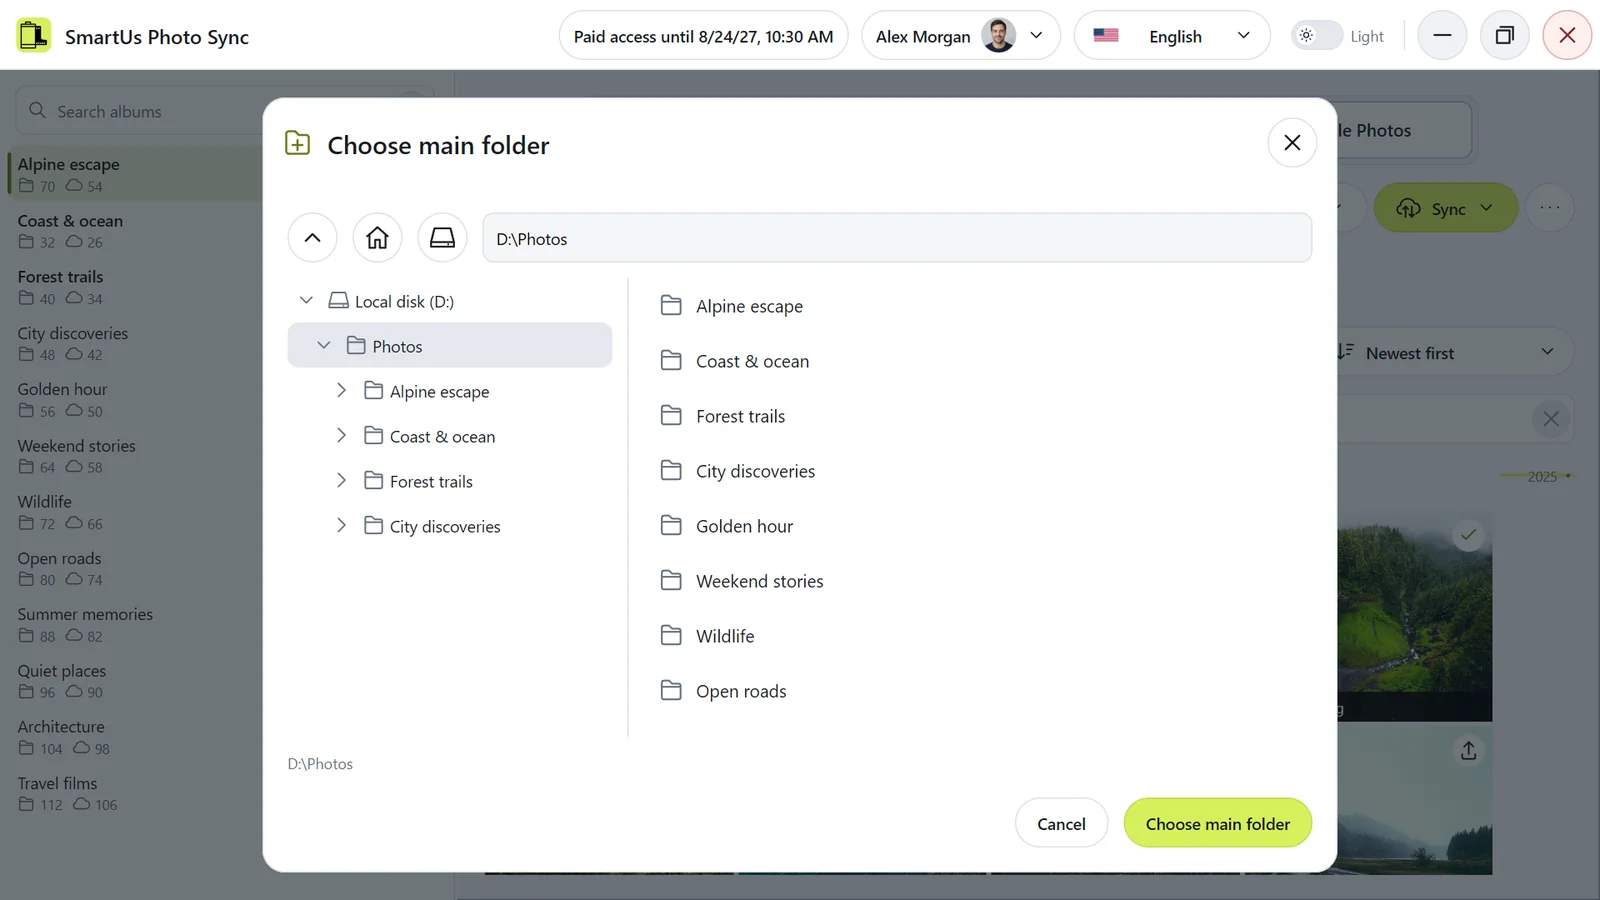
Open Settings → Main folder and click Choose main folder. Before a main folder is defined, the library also has this button in the middle of the window. Click Choose main folder, then confirm the search for differences between libraries. Choose the main folder

Choosing the main folder: the folders inside it become albums.
Choosing the main folder: the folders inside it become albums. Illustration of the application with demonstration data.

3. Choose the direction and review the plan

At the top, select Take into Google Photos or Take out of Google Photos. After you choose the main folder, the application looks for changes by itself. Later, click Find changes and choose Find changes in entire catalog or Find changes in selected album. The files that need synchronization are marked in the grid.

An album after finding changes: the files that still need synchronization are marked.
An album after finding changes: the files that still need synchronization are marked. Illustration of the application with demonstration data.
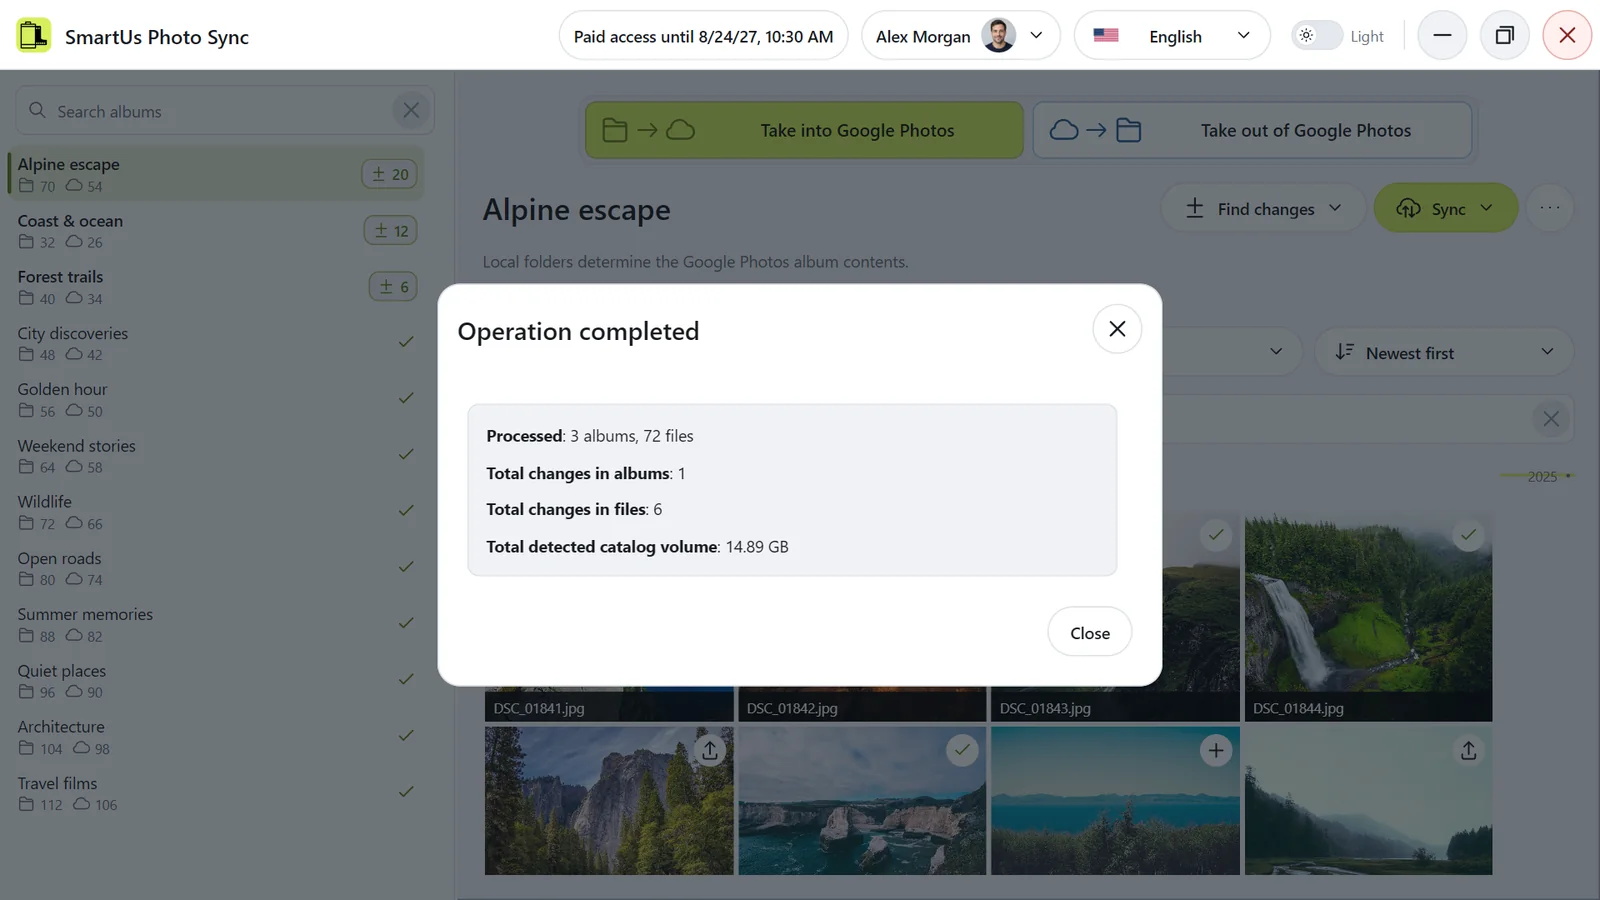
Report after finding changes, including the total detected catalog volume.
Report after finding changes, including the total detected catalog volume. Illustration of the application with demonstration data.

4. Synchronize

Click Sync, choose Sync entire catalog or Sync selected album, read the confirmation and confirm. When the work is done, a short report opens.

The short report after synchronization.
The short report after synchronization. Illustration of the application with demonstration data.

Synchronization requires a free trial or paid access for this computer; everything else is free. See What can I do for free?

Upload or download: choosing the direction

The large switch at the top of the main window has two positions:

  • Take into Google Photos: your folders are the source. Synchronization makes each Google Photos album contain the same photos and videos as its folder.
  • Take out of Google Photos: your Google Photos albums are the source. Synchronization makes each folder contain the same photos and videos as its album.
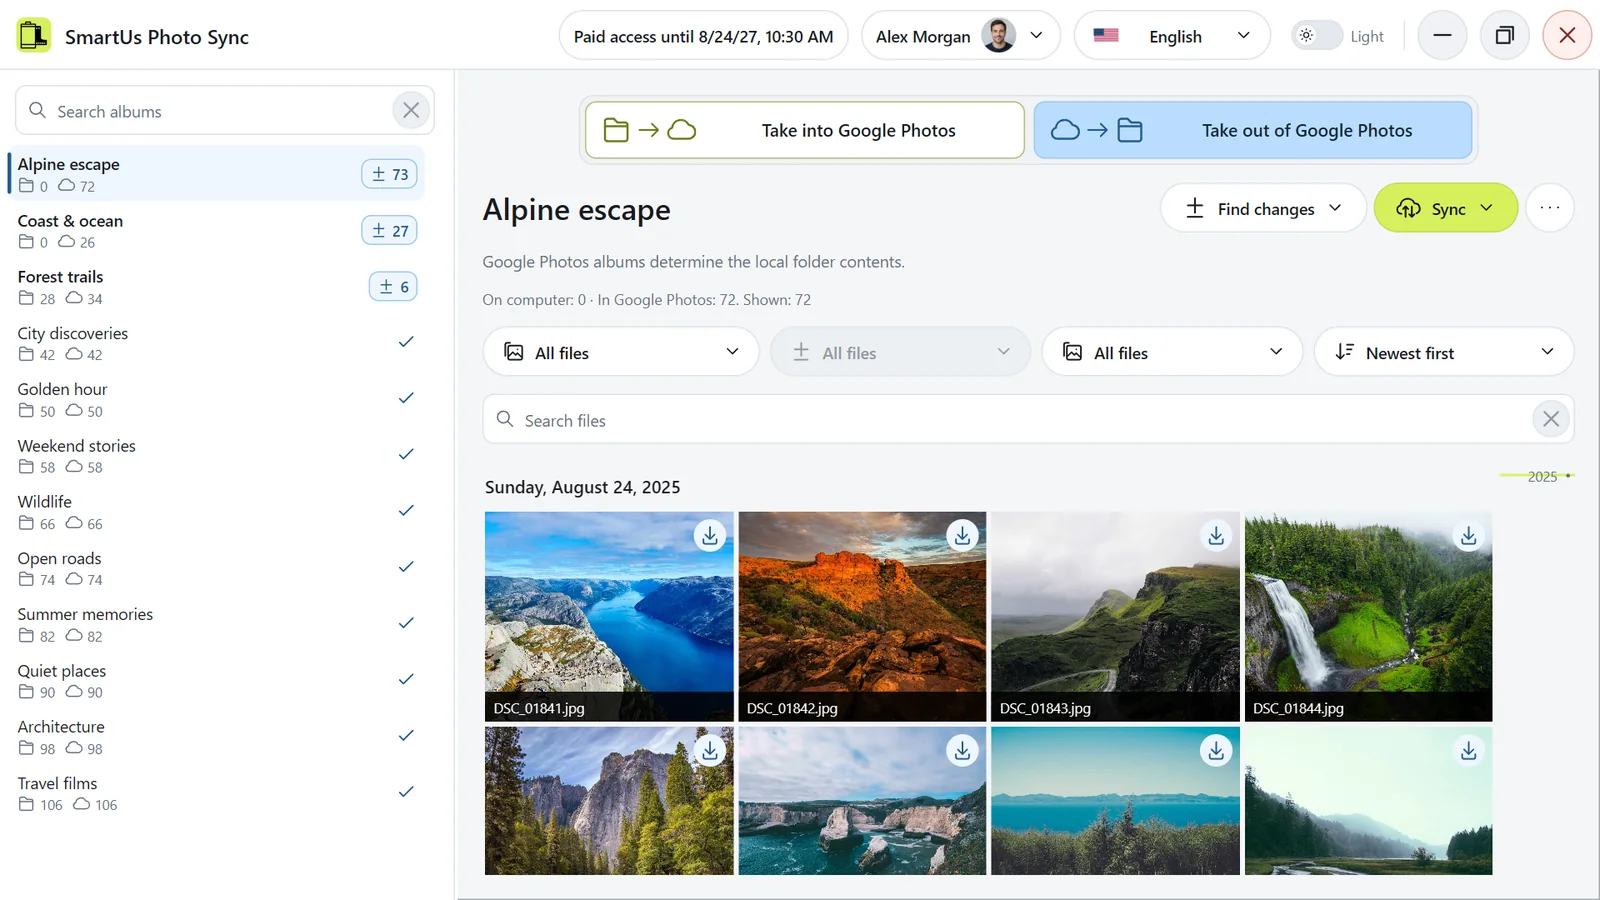
Take out of Google Photos: an album that is only in Google Photos, with its originals ready to download.
Take out of Google Photos: an album that is only in Google Photos, with its originals ready to download. Illustration of the application with demonstration data.

Take into Google Photos

  • A file only on your computer is uploaded and added to the album, or only added if it is already in your Google Photos.
  • A file only in the album is removed from the album and stays in your Google Photos library.
  • A folder without an album gets a new album, or your existing album with the same name.
  • An album without a folder in the main folder is deleted; its photos and videos stay in your library.

Take out of Google Photos

  • A file only in the album is downloaded into the folder as the original file.
  • A photo or video only in the folder is deleted from the folder.
  • An album without a folder gets a new folder inside the main folder, with all its files.
  • A folder without an album has its photos and videos deleted. The folder itself is deleted when nothing else remains in it.

In both directions, files that already match are left alone, and every change is shown in the plan before you confirm it.

Switching the direction

Switching only rebuilds the plan; it does not upload, download or delete anything by itself. If the application has not yet read everything the new direction needs, the affected albums show Find changes again: click Find changes first. The switch is unavailable while an operation is running.

When you open the application, it restores the direction of a plan that is waiting to be synchronized. Without such a plan, Take into Google Photos is selected.

How is it different from Google Takeout?

Google Takeout exports a copy of your Google account data as archives that you download and unpack. SmartUs Photo Sync works with your albums directly:

  • Albums become folders. Each of your own albums is downloaded into its own folder inside the main folder, with the album's name.
  • Original files only. Photos and videos are saved byte for byte, with the metadata embedded in the files. There are no archives to unpack and no JSON files to merge.
  • Repeatable. The next Find changes and Sync transfer only what changed: new photos are downloaded, and photos removed from an album are deleted from its folder.
  • Checked. Every downloaded file is checked against the original before it is saved. An interrupted file is never saved half-finished; it is downloaded again from the beginning.
  • Both ways. The same application uploads folders to Google Photos as albums.

What it does not download

  • photos and videos that are not in any of your albums;
  • albums and photos that other people shared with you;
  • information that Google keeps outside the file, such as descriptions you added in Google Photos, and edits made in Google Photos: the original file is downloaded.

To download photos that are not in an album, add them to an album in Google Photos first.

More: Incremental Google Photos backup.

Can I back up Google Photos incrementally?

Yes. Incremental backup and synchronization work in both directions. Each run compares your own Google Photos albums with local folders and transfers only what needs changing. Files whose content already matches are not uploaded or downloaded again. You choose the direction for each run: from Google Photos to folders, or from folders to Google Photos.

Set up your local copy

  1. Connect Google Photos.
  2. Choose the main folder. For your first download, choose an empty main folder. Wait for the initial search to finish and close its report.
  3. Select Take out of Google Photos at the top of the application.
  4. Click Find changes, choose Find changes in entire catalog and confirm the search. When it finishes, close its report.
  5. Review the plan. It shows which photos and videos need downloading and which files already match.
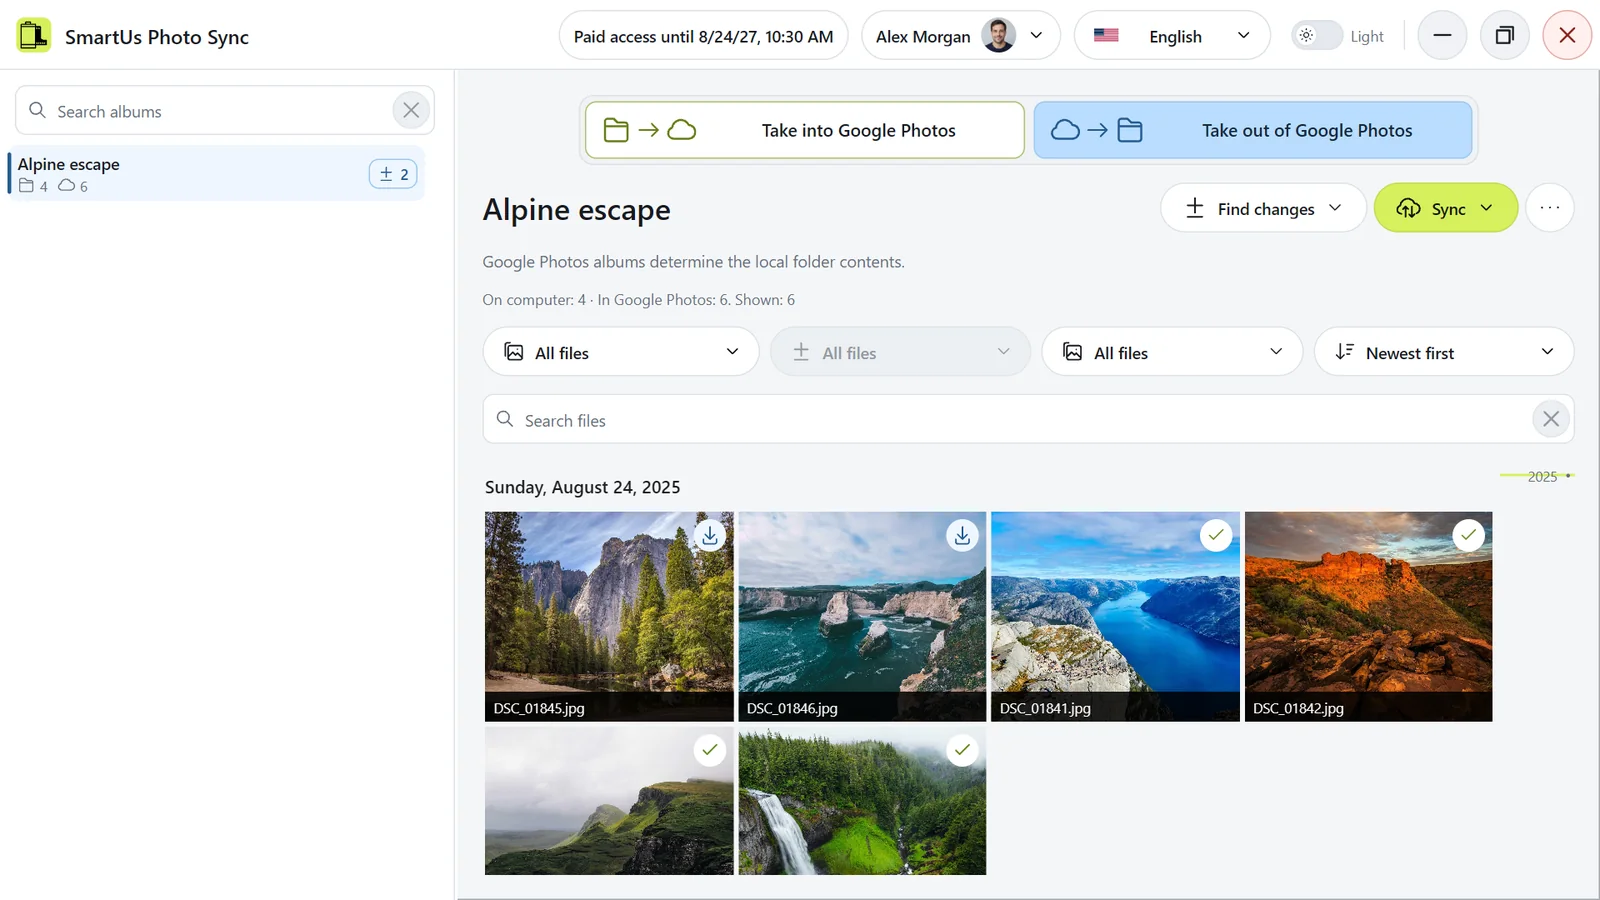
Example after finding changes: four originals are already on the computer and only two new files need downloading.
Example after finding changes: four originals are already on the computer and only two new files need downloading. Illustration of the application with demonstration data.
  1. Click Sync, choose Sync entire catalog, review the confirmation and confirm.

Update the same copy later

Keep the same Google account and main folder, then repeat steps 3–6 whenever you want to update the copy. The application downloads new or otherwise missing originals and keeps files that already match. You start each update yourself.

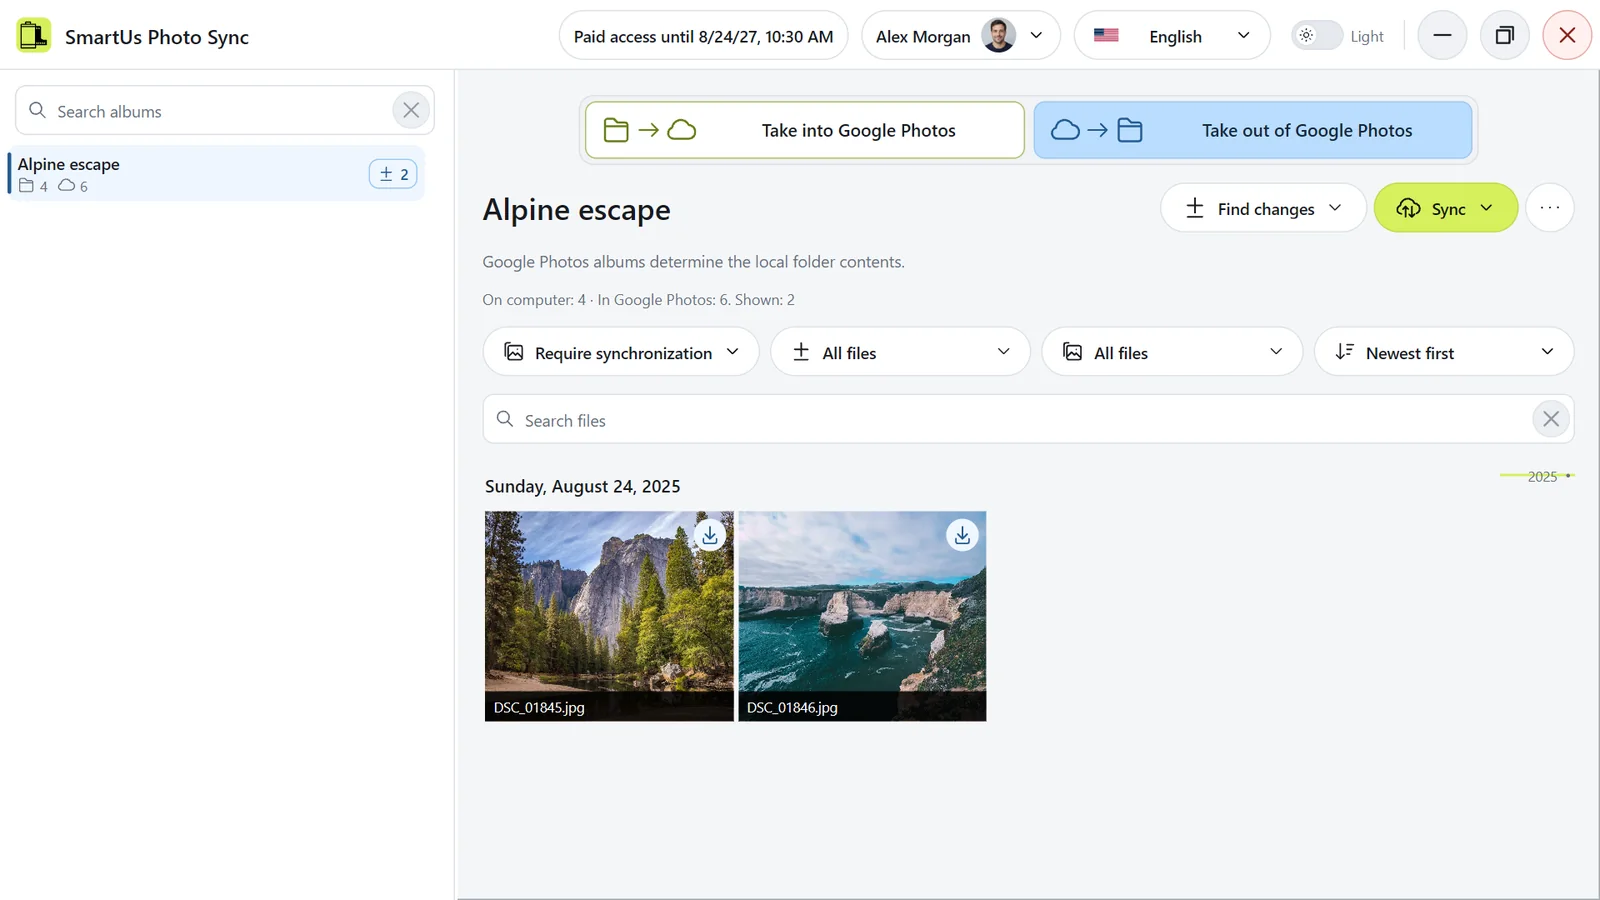
In this example, four of the album’s six files are already saved locally. Select Require synchronization to see just the two files that still need downloading.

The Require synchronization filter shows only the two pending downloads. The four matching files are kept.
The Require synchronization filter shows only the two pending downloads. The four matching files are kept. Illustration of the application with demonstration data.

Update Google Photos from local changes

Select Take into Google Photos. Click Find changes, choose Find changes in entire catalog and confirm the search. When it finishes, close its report and review the plan. Then click Sync, choose Sync entire catalog and confirm.

  • A file was added to a local folder: it is uploaded and added to the corresponding album. If identical content is already in your Google Photos, it is added to the album without uploading it again.
  • A file was removed from a local folder: it is removed from the corresponding Google Photos album. The original remains in your Google Photos library.

Each run follows the selected direction. You start the comparison and synchronization yourself.

Check deletions before confirming

In Take out of Google Photos, the local folders follow the current album contents. Photos removed from an album, or an album removed from Google Photos, can also be deleted locally after you confirm the plan. Keep a separate copy outside the main folder if you want to retain removed files or older versions.

More: Download original photos and videos.

What can I do for free?

After you connect Google Photos, these actions are free and need no registration or payment:

  • choosing the main folder and switching the direction;
  • finding changes and reviewing the full plan in both directions, so you can see exactly what would be uploaded, downloaded, added or removed;
  • browsing, searching and filtering files, viewing photos and playing videos.

Only Sync needs a free trial or paid access assigned to this computer, in either direction. The application checks access when you start synchronization.

Current prices and trial terms are shown on the website before payment. See How the free trial works and Buy access.

Does it sync automatically?

No. SmartUs Photo Sync has no automatic or background synchronization and no schedule.

  • Find changes prepares a plan and does not change anything on your computer or in Google Photos.
  • Sync applies the plan only after you confirm it.
  • Switching the direction only rebuilds the plan.
  • Connecting Google Photos or opening the application does not start anything.

When you choose the main folder, the application looks for changes by itself, but it still synchronizes nothing until you click Sync.

If you changed files on the computer or in Google Photos later, click Find changes again before synchronizing.

Will my files on the computer change?
In Take into Google Photos, no. The application only reads your folders. It does not move, edit, rename or delete your files.

In Take out of Google Photos, yes: that is its purpose. After you confirm the plan, synchronization makes each folder match its Google Photos album:

  • missing photos and videos are downloaded into the folder as original files;
  • photos and videos that are not in the album are deleted from the folder;
  • a folder is created inside the main folder for each album that has none;
  • a folder whose album does not exist is deleted together with its photos and videos.

Hidden files and files that are not photos or videos are never deleted. If such files remain, the folder is kept and the application tells you. Folders deeper inside an album folder and files directly in the main folder are not touched.

Every deletion appears in the plan first: check To remove before you click Sync. Keep backups of important files.

The application does not create service files in your photo folders. While a file is downloading, a temporary file is kept next to it and removed if the download fails.

Can it delete my photos in Google Photos?

The application never deletes photos or videos from your Google Photos library, in either direction.

What Take into Google Photos can change in Google Photos:

  • Remove a file from an album when the file is no longer in the matching folder. The file stays in your library and in your other albums.
  • Delete an album when it has no folder in the main folder, for example because you deleted the folder or never had one. The photos and videos of that album stay in your library.
  • Create or rename an album to match a folder.

Take out of Google Photos changes nothing in Google Photos; it changes only your folders.

Every change is shown in the plan first and happens only after you click Sync and confirm. Review the plan, especially album deletions: with Sync entire catalog in Take into Google Photos, every one of your albums without a folder in the main folder is deleted.

An unavailable drive or network folder is not treated as a deletion. See The main folder or a drive is unavailable.

Which photos and videos are supported?

Photos: JPG, JPEG, HEIC, PNG, GIF, WEBP, AVIF, BMP, TIF, TIFF, ICO and RAW files: ARW, CR2, CR3, DNG, NEF, ORF, PEF, RAF, RW2, SR2 and SRW.

Videos: MP4, MOV, M4V, AVI, MKV, WMV, ASF, MPG, MOD, MTS, M2TS, M2T, TOD, 3GP, 3G2, DIVX and MMV.

Other files in your folders are ignored and never deleted.

Limits of Google Photos

  • A photo larger than 200 MB or a video larger than 20 GB cannot be accepted by Google Photos.
  • Whether a particular RAW file is accepted is decided by Google for that file.

Originals

The application does not edit or convert files. Uploads send the original bytes of your files; downloads save the original files exactly as Google Photos keeps them, with the metadata embedded in them.

Previews

If a preview of a file cannot be shown, the grid shows an icon with the file format, for example JPG, HEIC, CR2 or MOV. This does not affect synchronization.

The application is built for very large libraries.

Change the language or the theme

The application and the website are available in English, Russian, German, French, Spanish and Italian.

  • In the application: the language selector and the light/dark theme switch are in the main header, next to your name. They are not in Settings.
  • On the website: the language selector and the theme button are in the page header.

The change applies immediately and is remembered. Switching the language does not reset your album, filters or a running operation.

Google Photos connection

Connect Google Photos

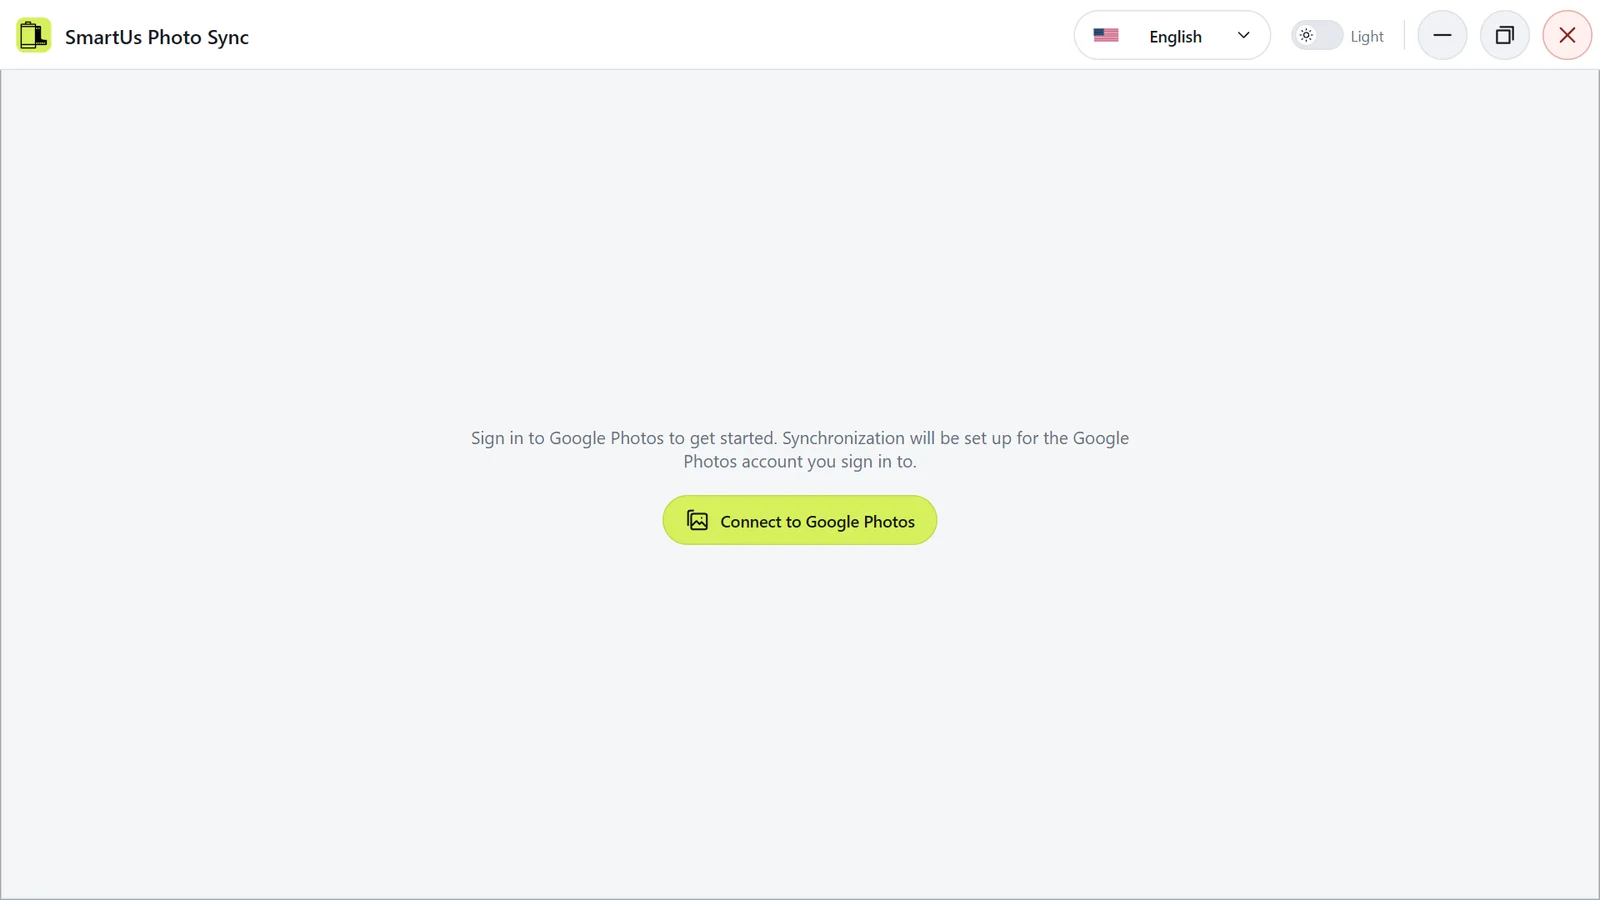
  1. On the welcome screen, click Connect to Google Photos.
The welcome screen with the button for connecting Google Photos.
The welcome screen with the button for connecting Google Photos. Illustration of the application with demonstration data.
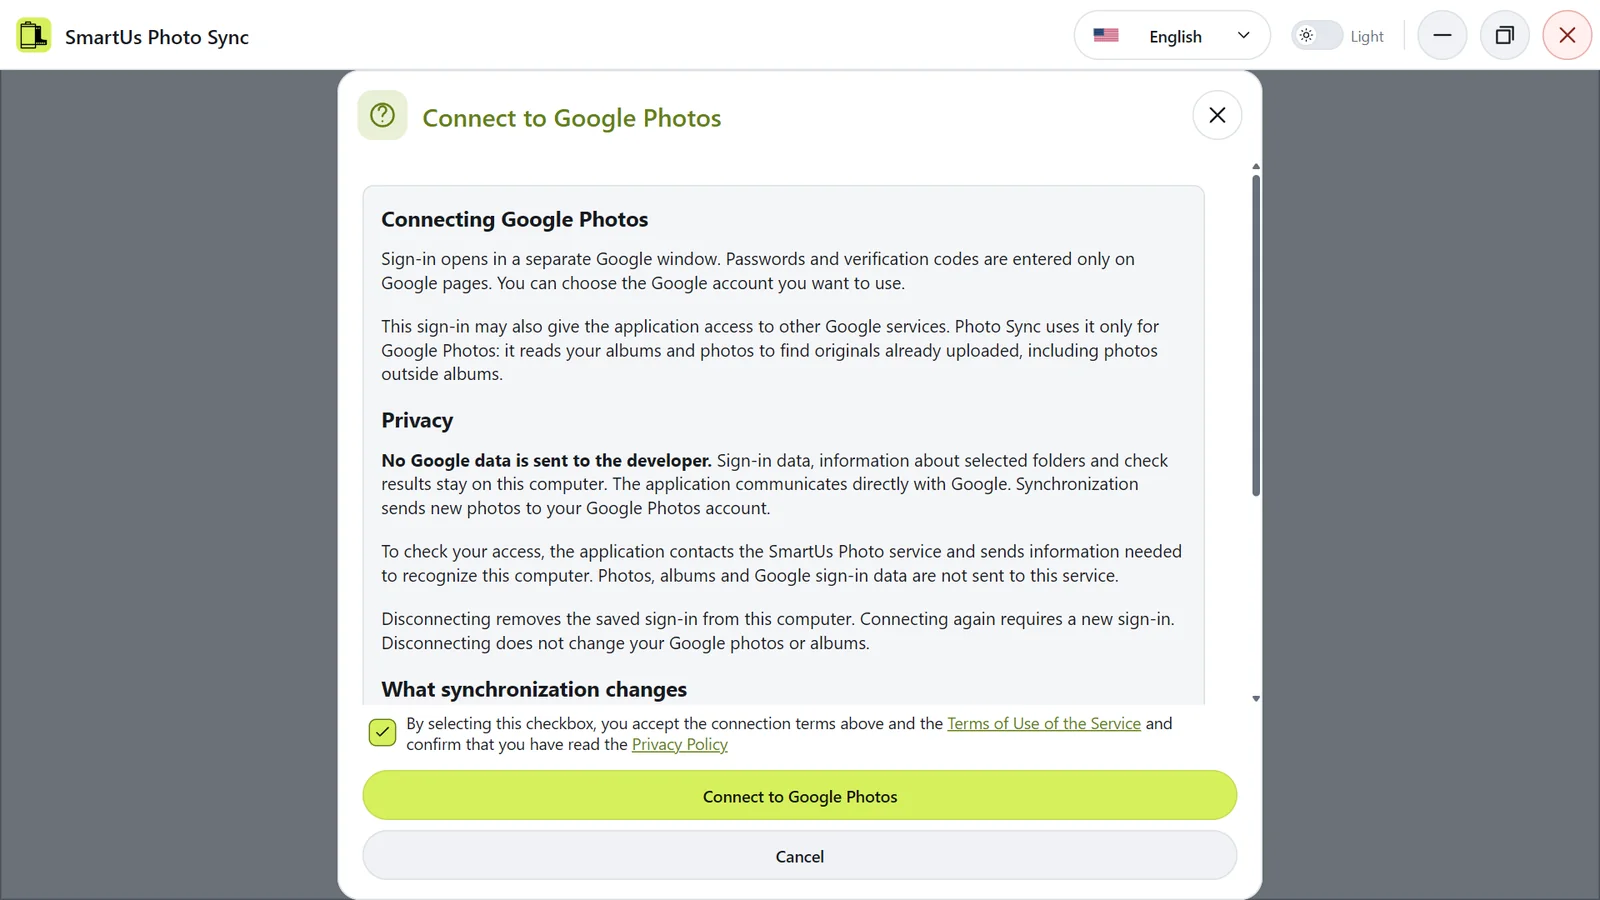
  1. A notice explains how the connection works. Read it and tick the checkbox: this means you accept the connection terms in the notice and the Terms of Use and confirm that you have read the Privacy Policy.
  2. Click Connect to Google Photos in the notice.
The connection notice: read it, tick the checkbox and connect.
The connection notice: read it, tick the checkbox and connect. Illustration of the application with demonstration data.
  1. Complete the sign-in in Google’s separate window.

Enter your password and verification code only in Google’s window. The application opens Google in its own browser window with a separate profile; your usual browser and its data are not used.

Result: your library opens. Connecting does not start finding changes or synchronization. Next time, the application restores the connection by itself.

If the connection is lost later, the welcome screen appears again with an explanation; click Connect to Google Photos to reconnect. Your library, main folder and settings are kept.

Switch or disconnect the Google account

  1. Finish any running operation.
  2. Click your name or picture in the application header, then Settings.
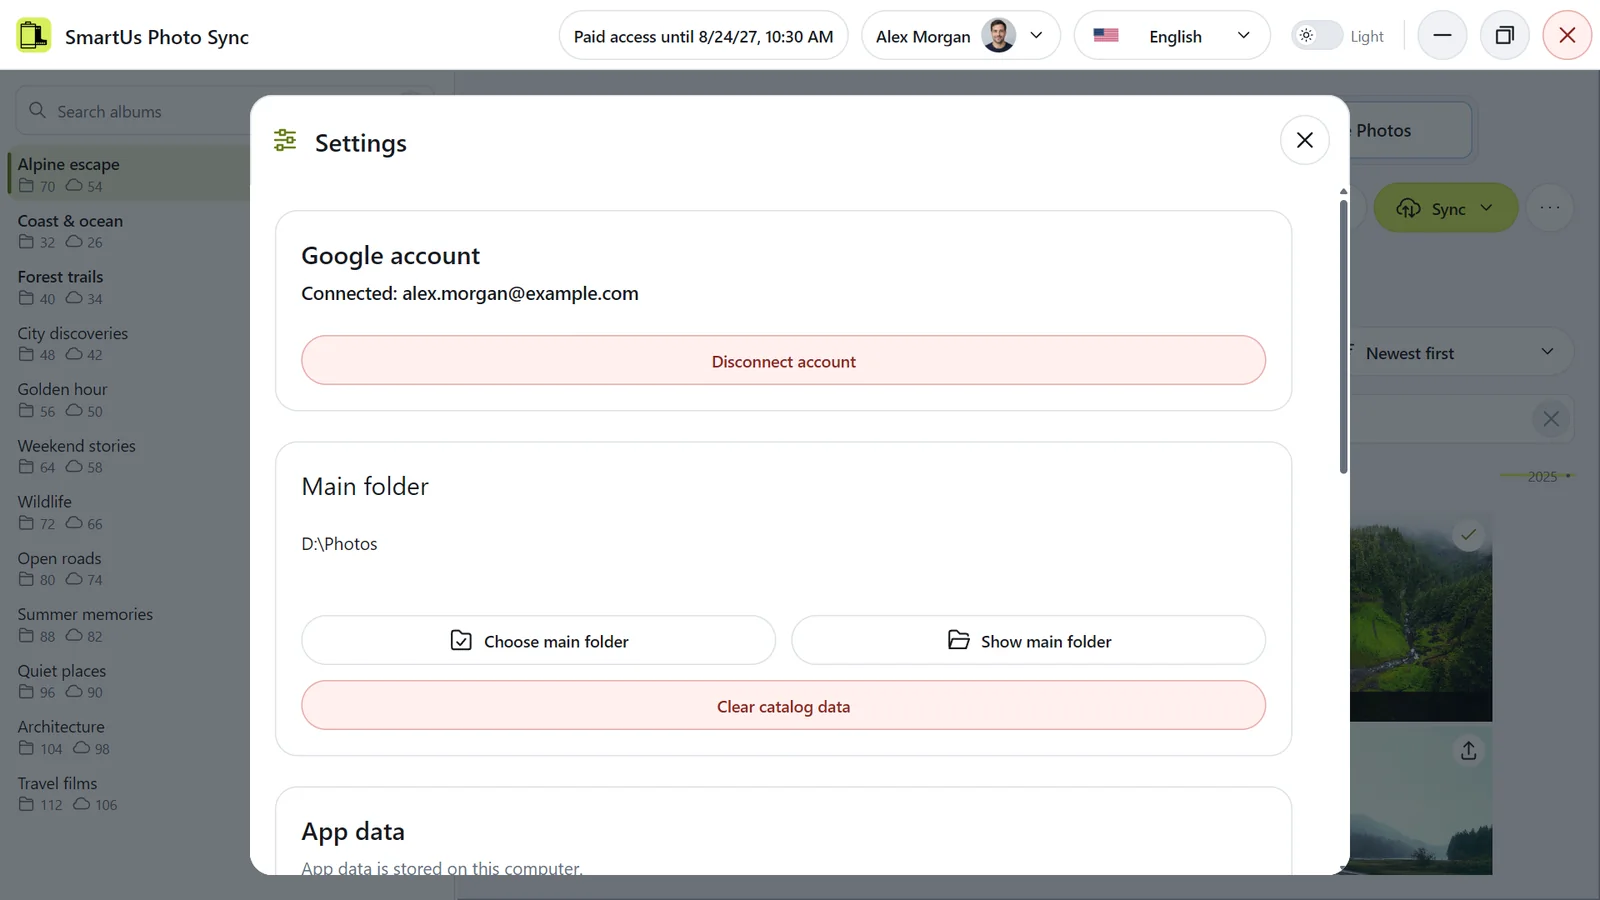
  3. In the Google account section, click Disconnect account.
  4. Read the warning and confirm Disconnect.
  5. On the welcome screen, connect the account you need.
Settings with the connected Google account.
Settings with the connected Google account. Illustration of the application with demonstration data.

Disconnecting removes the saved Google sign-in from this computer. Your photos and albums in Google Photos are not affected, and the library of the disconnected account stays saved on the computer.

Each Google account has its own library and its own main folder in the application. To continue with the same library later, connect the same Google account again.

The sign-in window did not open or the connection was lost

The Google window did not open or stopped responding

  1. Close only the sign-in window that the application opened.
  2. In the application, click Connect to Google Photos once more.

You do not need to change browser or system settings, and you do not need to delete any application data.

The welcome screen appeared instead of my library

This means the saved connection could not be confirmed, for example because Google asks you to sign in again or the internet connection was lost. Click Connect to Google Photos and sign in with the same Google account. Your library, main folder and plans are kept.

Website account and Google Photos account

SmartUs Photo Sync uses two independent sign-ins:

  • Google Photos in the application opens your photo library. Photos travel only between your computer and Google Photos.
  • Your account on the website is where you manage computers and access purchases. You sign in with the Sign in button on the website.

They can be different Google accounts. Signing in on the website does not give the website access to your Google Photos.

Access belongs to a computer, not to a Google Photos account. If you use several Google Photos accounts on the same computer, they share that computer’s access and trial; each of them has its own main folder.

Main folder and albums

Choose the main folder

  1. Open Settings → Main folder and click Choose main folder. Before a main folder is defined, the library also has this button in the middle of the window.
  2. Use Folder path or Drives to go to the folder that holds your album folders, for example “Photos”.
  3. Click Choose main folder, then confirm the search for differences between libraries.
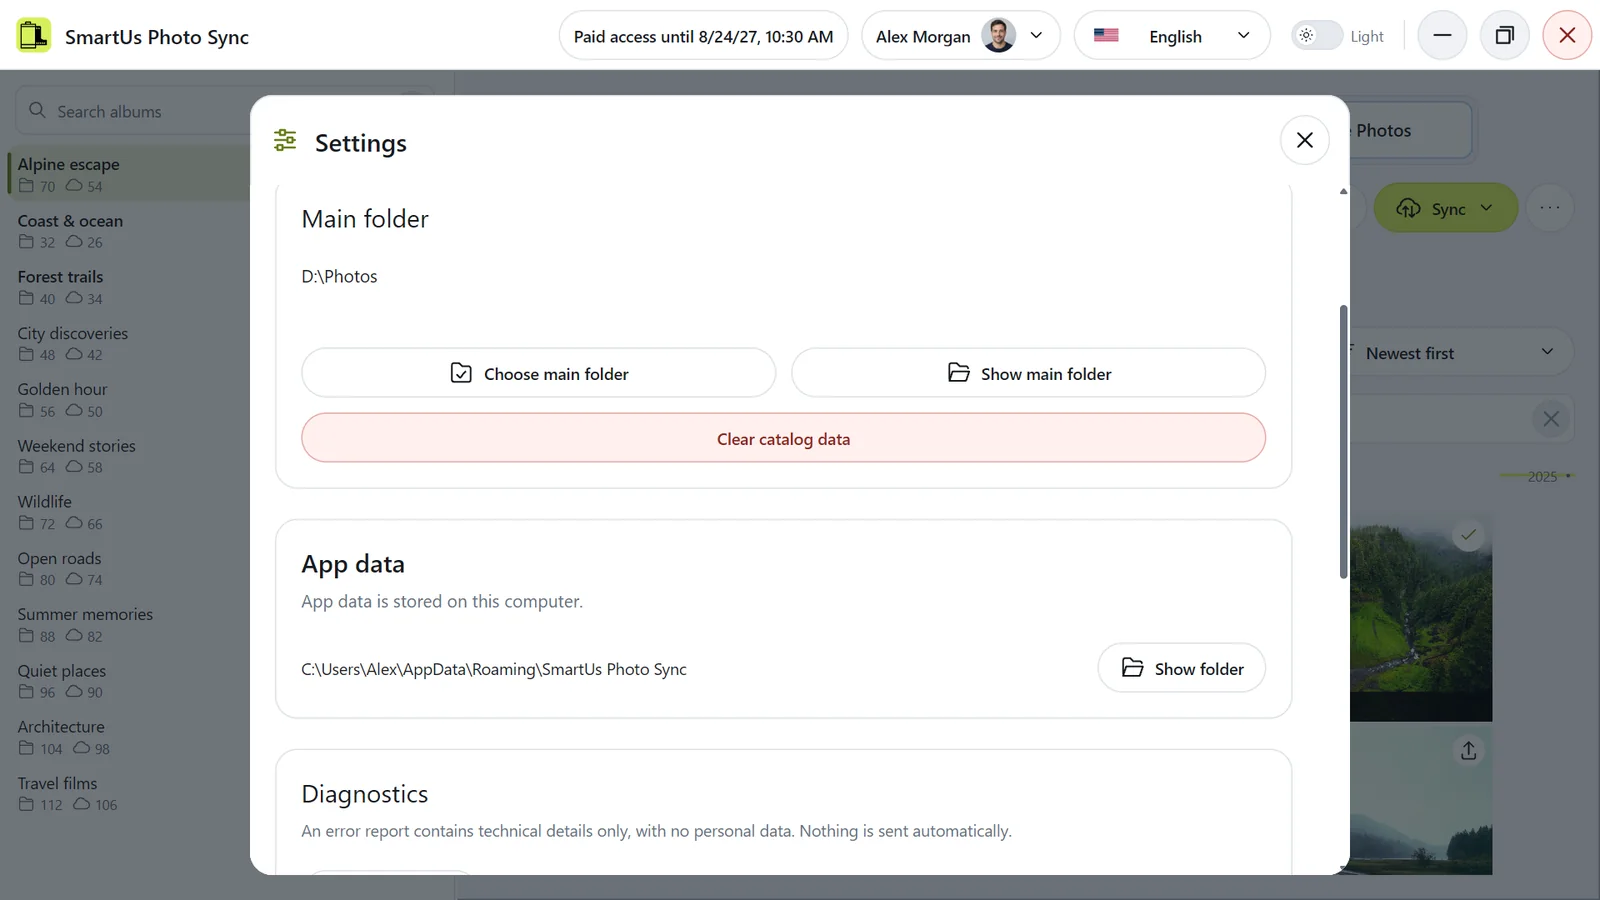
Main folder settings with the full path and buttons to choose and show the folder.
Main folder settings with the full path and buttons to choose and show the folder. Illustration of the application with demonstration data.

The Main folder section shows the full path of the current folder. Click Show main folder to open it on your computer.

Choosing the main folder: the folders inside it become albums.
Choosing the main folder: the folders inside it become albums. Illustration of the application with demonstration data.

Result: every folder inside the main folder is added as an album, and the application immediately looks for changes. Nothing is uploaded or downloaded yet.

  • Choose the folder that contains your album folders, not one album folder.
  • New folders that you add inside the main folder are added to the library the next time you find changes with Find changes in entire catalog.
  • The main folder can be on an internal or external drive, a USB drive, a network folder or a NAS. It can also be empty, for example when you want to download your albums.
  • Each Google account has its own main folder. To open it, click your name in the header, then Show main folder.

Choosing the main folder is free. See also What goes into an album and A folder is not shown as an album.

What goes into an album

  • One folder is one album. Each folder directly inside the main folder is an album with the same name.
  • Only files directly in that folder belong to the album. Folders inside an album folder, and everything in them, are ignored.
  • Files directly in the main folder do not belong to any album.
  • Hidden files and folders are skipped. A dot in a name does not hide anything.
  • Unsupported files are ignored. See Which photos and videos are supported?
  • An empty folder is an album too: in Take into Google Photos, synchronization creates an empty album for it.

Your existing albums and photos

The application works with all of your own albums, including those you created before you installed SmartUs Photo Sync. When a folder has no linked album yet, your existing album with the same name is used instead of creating a new one. Photos and videos with the same content as the local files are not uploaded again; they are only added to the album if needed. Files are matched by their content, not their names.

In Take out of Google Photos, your albums that have no folder yet get a new folder inside the main folder.

Albums and photos that other people shared with you are never used, downloaded or changed.

A folder is not shown as an album

  • The folder is deeper inside. Only folders directly inside the main folder are albums. Move the folder up one level, or choose another main folder.
  • Hidden folder. Hidden folders are skipped, and a hidden folder cannot be chosen as the main folder.
  • Same name. Two folders whose names differ only in upper and lower case, for example “Trip” and “trip”, have one album name. The first folder is used and the other is skipped; their contents are not merged.
  • Not found yet. A new folder appears after the next Find changes with Find changes in entire catalog.

If the main folder itself cannot be opened, see The main folder or a drive is unavailable.

Change the main folder or work with one album

Choose another main folder

Click Settings → Main folder → Choose main folder, choose the new folder and confirm the search. The application saves the new main folder and starts finding differences automatically. The folders of the previous main folder leave the application’s library. Nothing is moved or deleted on your computer or in Google Photos because of this. Let the search finish and review the plan before you synchronize.

Main folder settings with the full path and buttons to choose and show the folder.
Main folder settings with the full path and buttons to choose and show the folder. Illustration of the application with demonstration data.

The new main folder is saved only after the search confirmation. Cancelling that prompt keeps the previous folder; interrupting the search after confirming keeps the new folder.

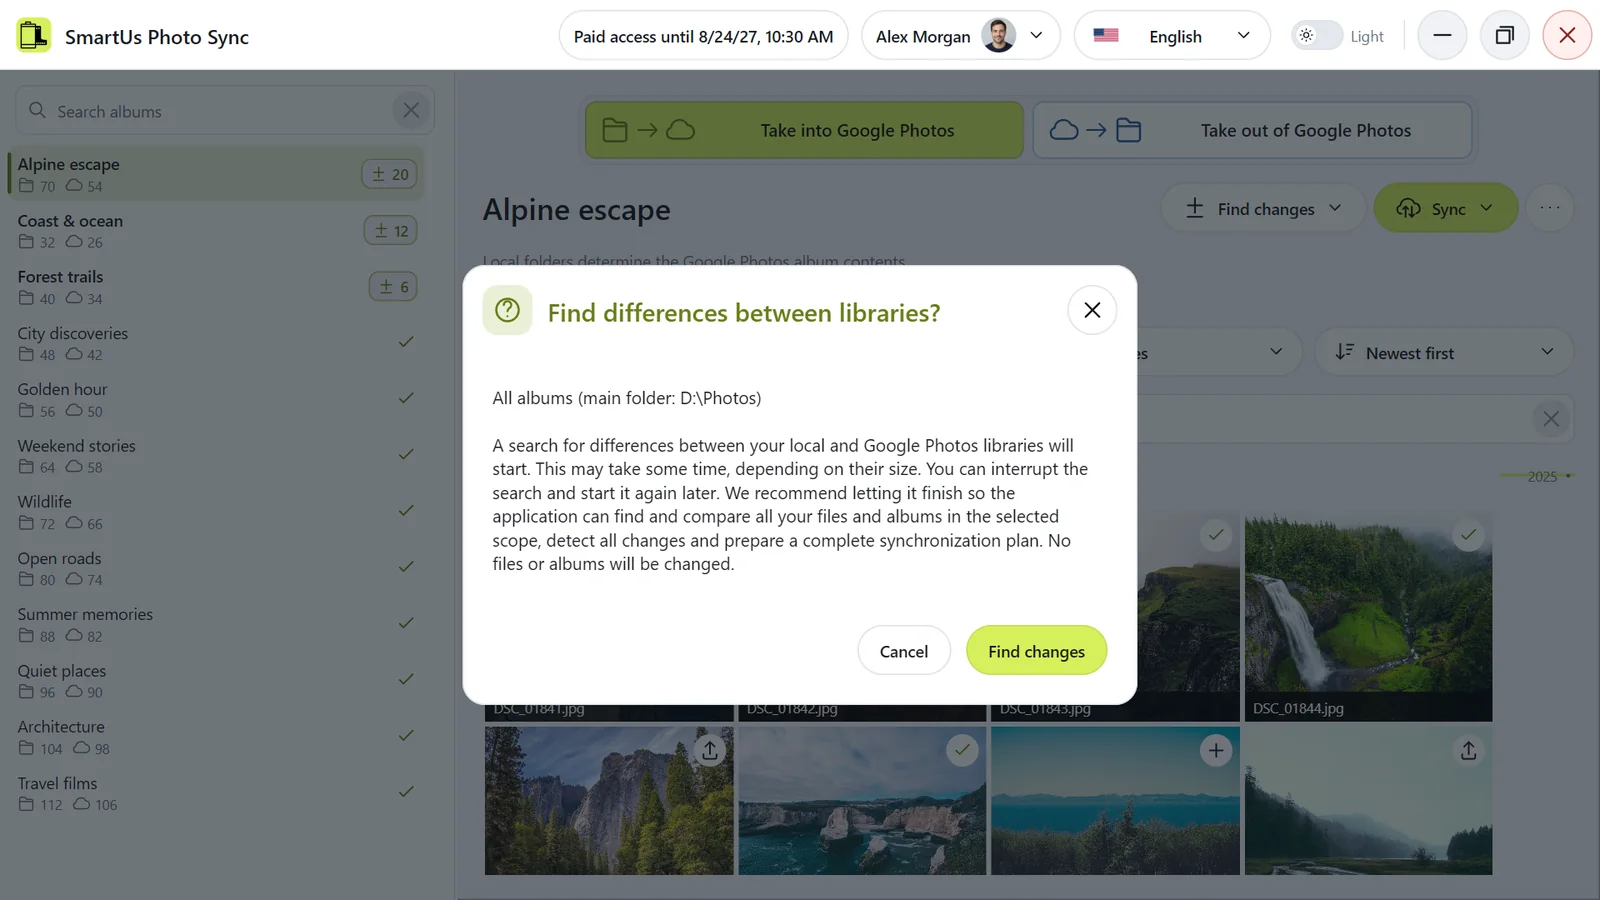
Confirmation before finding differences between libraries.
Confirmation before finding differences between libraries. Illustration of the application with demonstration data.

Work with one album only

Every folder inside the main folder and every one of your own Google Photos albums belongs to the catalog. To change only one album, select it on the left and use Find changes in selected album and Sync selected album; the other albums are not changed.

To keep a folder out of synchronization, keep it outside the main folder. Before you synchronize the entire catalog, check the plan: in Take into Google Photos, an album without a folder is deleted (its photos stay in your library); in Take out of Google Photos, a folder without an album is deleted.

The album menu

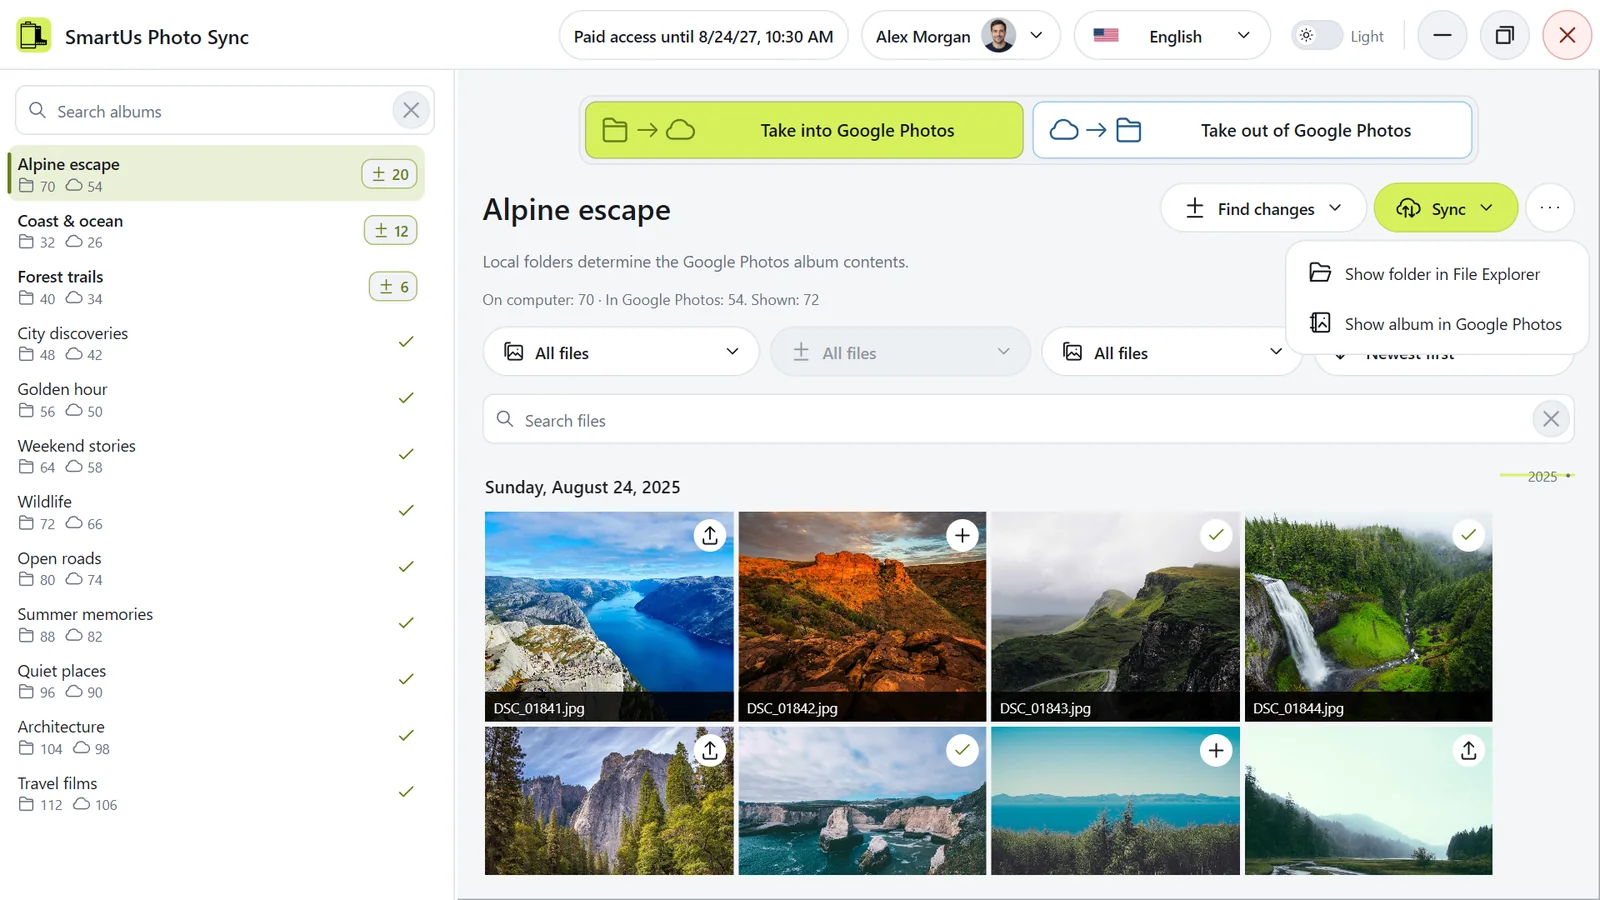
The three-dot Details button next to Sync opens the album menu. The first item opens the album’s folder in your file manager, and Show album in Google Photos opens the album in Google Photos. To open the main folder, click your name in the header, then Show main folder.

The album menu at the top right.
The album menu at the top right. Illustration of the application with demonstration data.

The main folder or a drive is unavailable

If the main folder is on a disconnected USB drive, an unreachable NAS or a network folder you cannot access, finding changes and synchronization stop with an explanation. An unavailable folder is never treated as empty or deleted, and nothing is deleted because of it.

  • Reconnect the drive or network folder, then click Find changes again.
  • Or choose another main folder with Settings → Main folder → Choose main folder.

If one album folder cannot be opened, for example because of its permissions, the plan only removes it from the application’s library; the folder, its files and its album are not changed. If a file cannot be read, that file is marked with an error and the other files continue. A read error never causes files or albums to be removed.

Browse, search, filter and sort

The main window: albums on the left, the direction switch at the top, files in the middle.
The main window: albums on the left, the direction switch at the top, files in the middle. Illustration of the application with demonstration data.

Choose what to show

  1. Select an album on the left. Search albums above the list finds an album by name.
  2. In File filter, choose All files, Synchronized or Require synchronization.
  3. In File type, choose All files, Photos or Videos.
  4. Type part of a file name in Search files. The × button clears the search.

The list on the left shows the folders of your main folder and your Google Photos albums together; a folder and its album are one row. Under each name you see the number of files on your computer and in Google Photos. The numbers On computer, In Google Photos and Shown above the grid describe the selected album.

Sort and jump to a date

  • In Sort order, choose Newest first, Oldest first, Name: A–Z or Name: Z–A.
  • With date sorting, use the date bar on the right to jump to a date.

A local file without a capture date uses its modification date. Sorting and filters never change your files.

Filters do not limit synchronization: Sync always applies the whole plan of the selected album or the entire catalog.

What the file and album statuses mean

After Find changes, each file shows its state:

  • Synchronized: the file is in place on both sides.
  • New files to upload: in Take into Google Photos, the file is not in your Google Photos yet; it will be uploaded and added to the album.
  • Existing files to add: in Take into Google Photos, the file is already in your Google Photos; it will only be added to the album, without uploading.
  • To download: in Take out of Google Photos, the file is only in the album; its original will be downloaded into the folder.
  • To remove: in Take into Google Photos, the file will be removed from the album and stay in your Google Photos library; in Take out of Google Photos, the file will be deleted from the folder.
  • Find changes again: the album needs a new Find changes before its plan can be applied.
An album after finding changes: the files that still need synchronization are marked.
An album after finding changes: the files that still need synchronization are marked. Illustration of the application with demonstration data.

Hover over a file’s status icon to read an explanation. A small red triangle marks a file or album with an error; its tooltip explains the cause.

Albums on the left

An album with planned changes shows a badge with the number of changes: green in Take into Google Photos, blue in Take out of Google Photos. Hover over the badge to see the Synchronization plan. A grey exclamation mark means the album needs a new Find changes; a check mark means it is synchronized.

Show only one kind of change

  1. Set File filter to Require synchronization.
  2. In Change filter, choose the change you want to see.

Change filter is available only when the first filter is Require synchronization.

Finding changes and syncing

Find changes and review the plan

  1. Select the direction at the top: Take into Google Photos or Take out of Google Photos.
  2. Click Find changes and choose Find changes in entire catalog or Find changes in selected album, then confirm.
  3. Review the plan: the marks on the files, the badges of the albums and the short report.

Both libraries are read in either direction. We recommend letting the search finish so every file and album in the selected scope is compared and the synchronization plan is complete. You can interrupt the search and start again later.

Confirmation before finding differences between libraries.
Confirmation before finding differences between libraries. Illustration of the application with demonstration data.
An album after finding changes: the files that still need synchronization are marked.
An album after finding changes: the files that still need synchronization are marked. Illustration of the application with demonstration data.

Finding changes only reads your folders and your Google Photos albums and prepares a plan. It does not change anything on your computer or in Google Photos.

Find changes in entire catalog checks every folder of the main folder and every one of your albums, and finds new folders and albums. Find changes in selected album checks only the selected folder and its album.

The report shows how many albums and files were checked and how many changes were found on your computer and in Google Photos. If several of your albums have the same name, the application uses the first of them; you can rename the others in Google Photos.

Run Find changes again whenever you changed files on the computer or albums in Google Photos, before you synchronize. Finding changes is free.

Synchronize your changes

  1. Check the direction at the top and the plan of your albums.
  2. Click Sync and choose Sync entire catalog or Sync selected album.
  3. Read the confirmation and confirm only if the plan is what you intend.
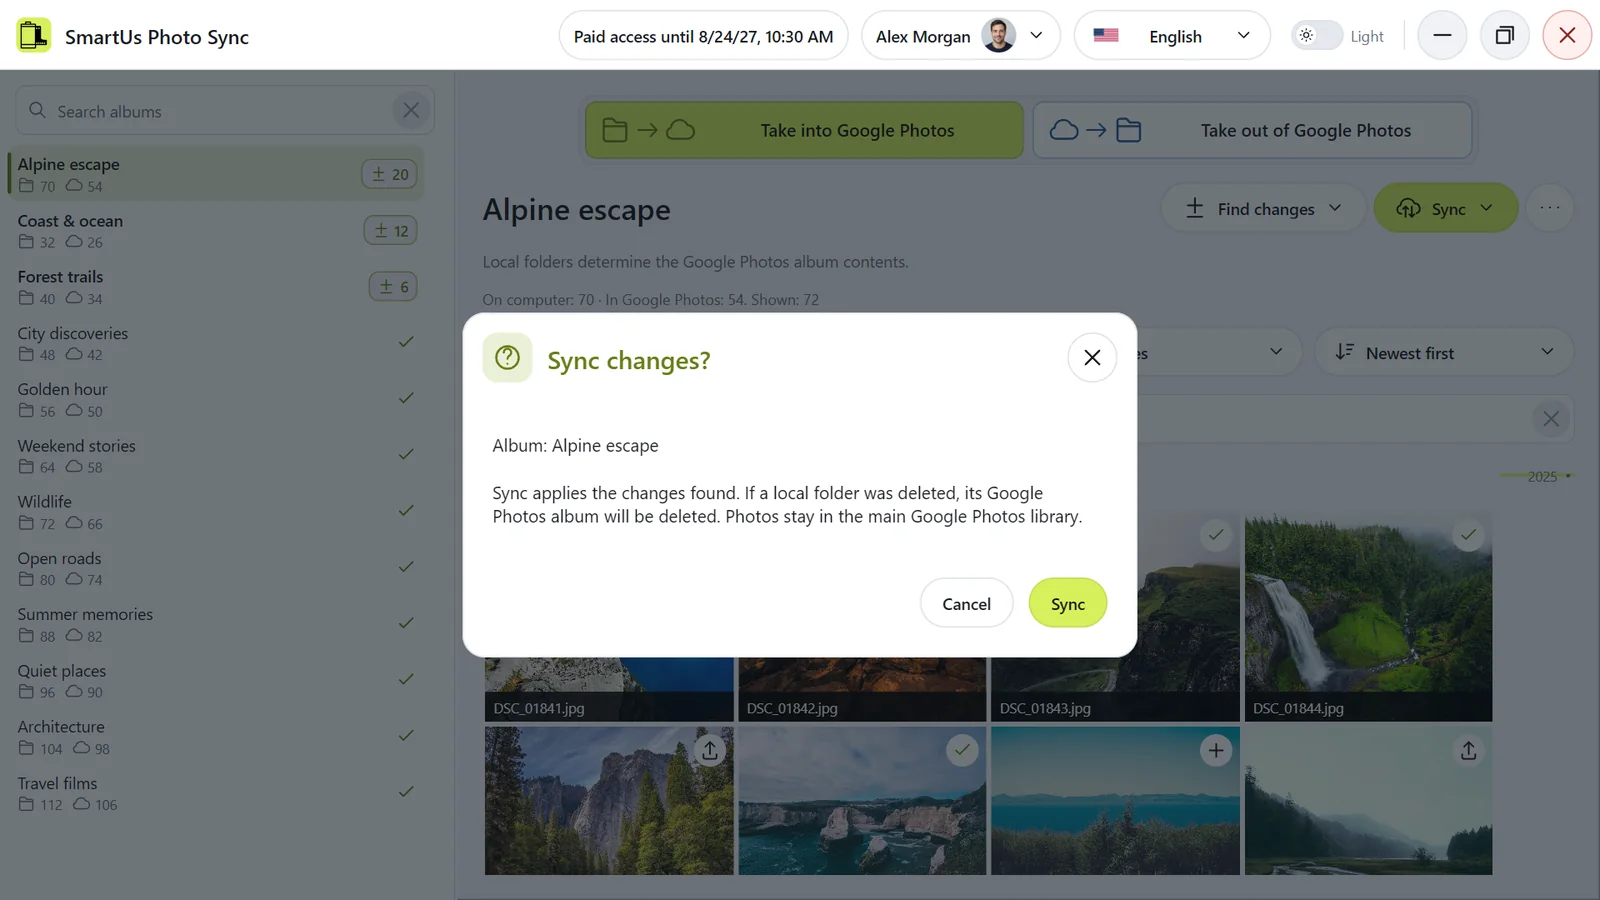
The confirmation before synchronization in Take into Google Photos.
The confirmation before synchronization in Take into Google Photos. Illustration of the application with demonstration data.

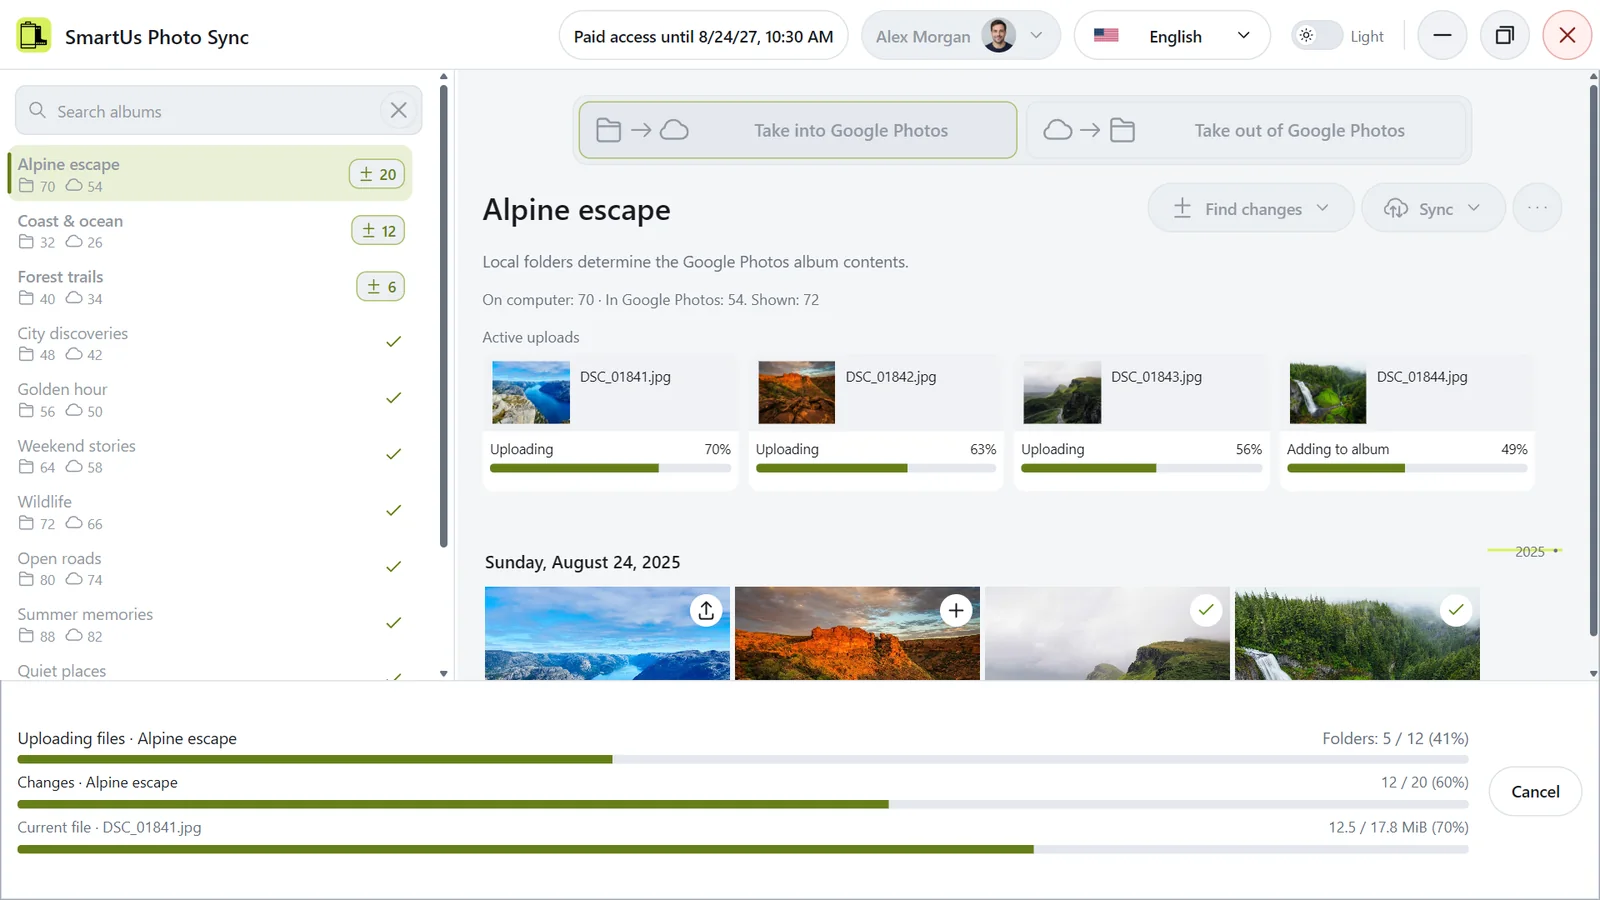
While synchronization runs, each active upload or download shows its own progress, and the bar at the bottom shows the albums, the changes of the current album and the current file.

Synchronization in progress; the Cancel button is in the progress bar at the bottom.
Synchronization in progress; the Cancel button is in the progress bar at the bottom. Illustration of the application with demonstration data.

When it finishes, a short report shows what was done. See Read the results report.

Good to know

  • Synchronization applies the plan of the last Find changes. If something changed since then, the application asks you to find changes again instead of applying an outdated plan.
  • Up to four files transfer at the same time. As soon as one finishes, the next file starts.
  • Filters and search in the grid do not limit what is synchronized.
  • Synchronization requires a trial or paid access for this computer; it is checked when you start.
  • Keep backups of your original files.

Download albums to your computer

  1. Choose the main folder where the album folders should be: Choose the main folder. It can be empty.
  2. Select Take out of Google Photos at the top.
  3. Click Find changes and choose Find changes in entire catalog or Find changes in selected album. Albums that have no folder yet get one in the plan.
  4. Click Sync, read the confirmation and confirm.
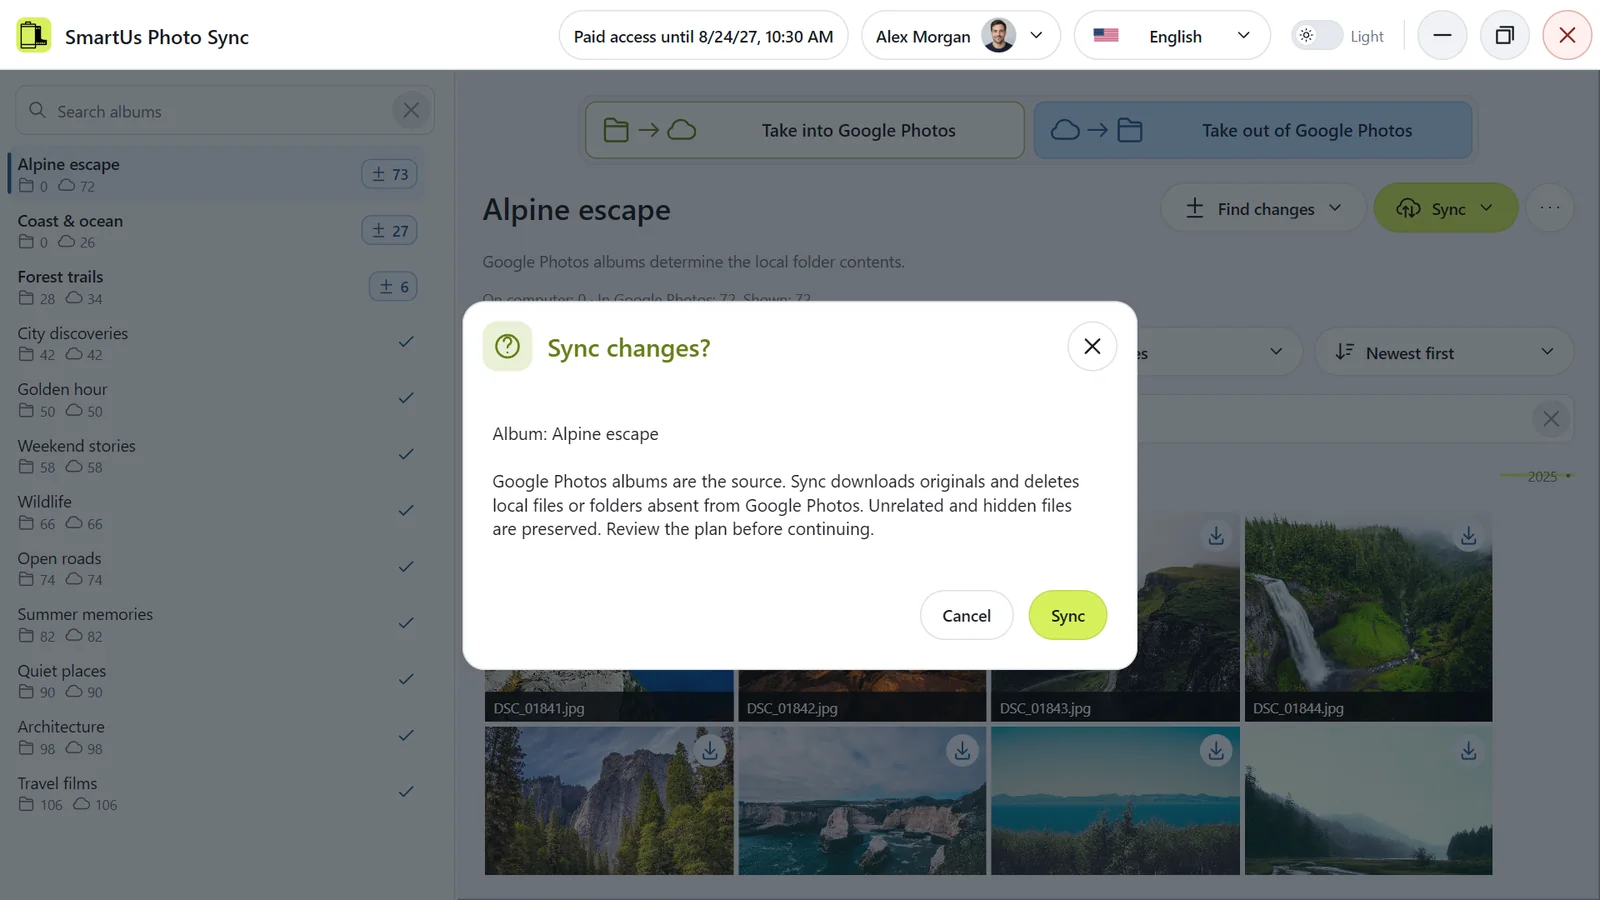
The confirmation before downloading: Google Photos albums are the source.
The confirmation before downloading: Google Photos albums are the source. Illustration of the application with demonstration data.

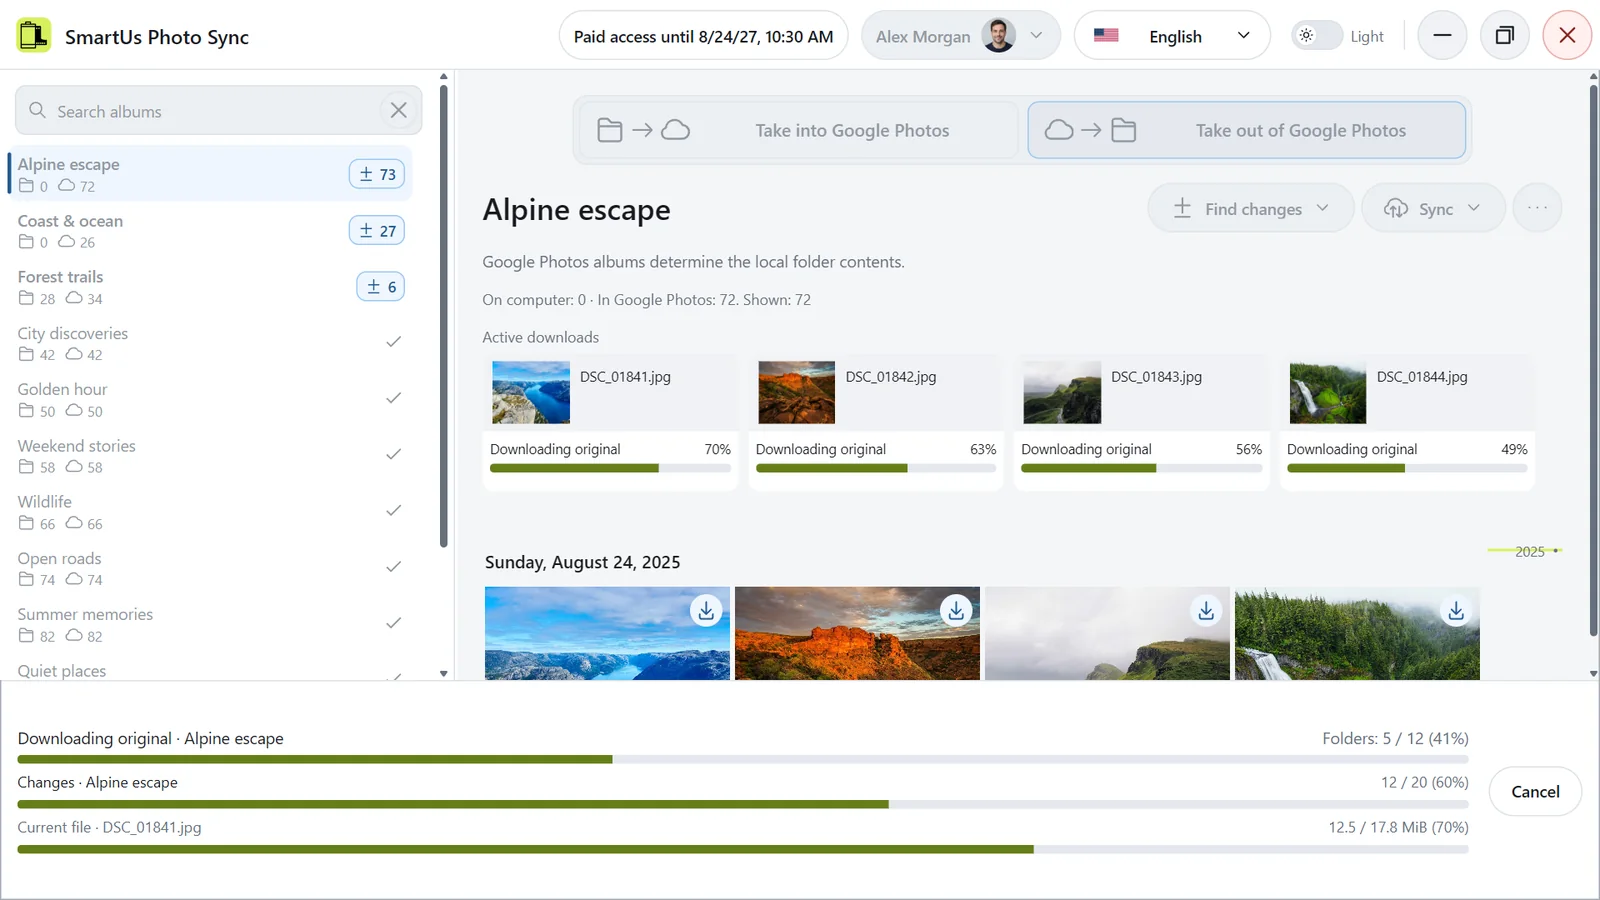
Originals download four at a time, each with its own progress.

Four originals downloading at the same time, each with its own progress.
Four originals downloading at the same time, each with its own progress. Illustration of the application with demonstration data.

What you get

  • one folder per album inside the main folder, with the album’s name;
  • the original photo and video files, byte for byte, with the metadata embedded in them;
  • a copy in each folder when a photo is in several albums.

Names that are not allowed on your computer, or that repeat in the same folder, get a safe name with a suffix. An existing file is never overwritten.

Reliability

A file appears in the folder only after it has been downloaded completely and checked. If a download is interrupted, nothing broken is saved, and the next Sync downloads that file again from the beginning. Completed files are kept after Cancel, a lost connection or a restart.

Before you sync

In Take out of Google Photos, your albums decide what the folders contain: photos and videos that are not in the album are deleted from its folder. See Will my files on the computer change?
Downloaded and deleted files count as file changes during the free trial.

The Sync button is disabled

Sync becomes available when the selected album, or at least one album of the catalog, has a current plan with changes. It may be disabled because:

  • there is no main folder yet: choose it first;
  • another operation is running: wait for it to finish;
  • there is no current plan: click Find changes;
  • no changes were found: everything is already synchronized, there is nothing to apply.

In its menu, Sync selected album needs changes in the selected album, while Sync entire catalog needs changes in any album.

A disabled button does not mean a problem with your access. The access is checked only after you click Sync.

Long operations, progress and Cancel

Large libraries and videos take time. If the progress keeps changing, the operation is still running; let it continue.

Synchronization in progress; the Cancel button is in the progress bar at the bottom.
Synchronization in progress; the Cancel button is in the progress bar at the bottom. Illustration of the application with demonstration data.

Stop an operation

  1. Click Cancel in the progress bar at the bottom of the window.
  2. Confirm Cancel sync or Cancel finding changes.

The application stops starting new tasks, but files that are already being uploaded, downloaded or added are finished properly. That is why the operation may continue for a short while after Cancel. Completed changes are kept. An interrupted download is not saved; the next Sync downloads that file again from the beginning.

Keep the application open until it finishes. Do not start a second copy of the application or press buttons repeatedly.

After the operation ends, read the report. See After an interruption or an uncertain result.

Read the results report

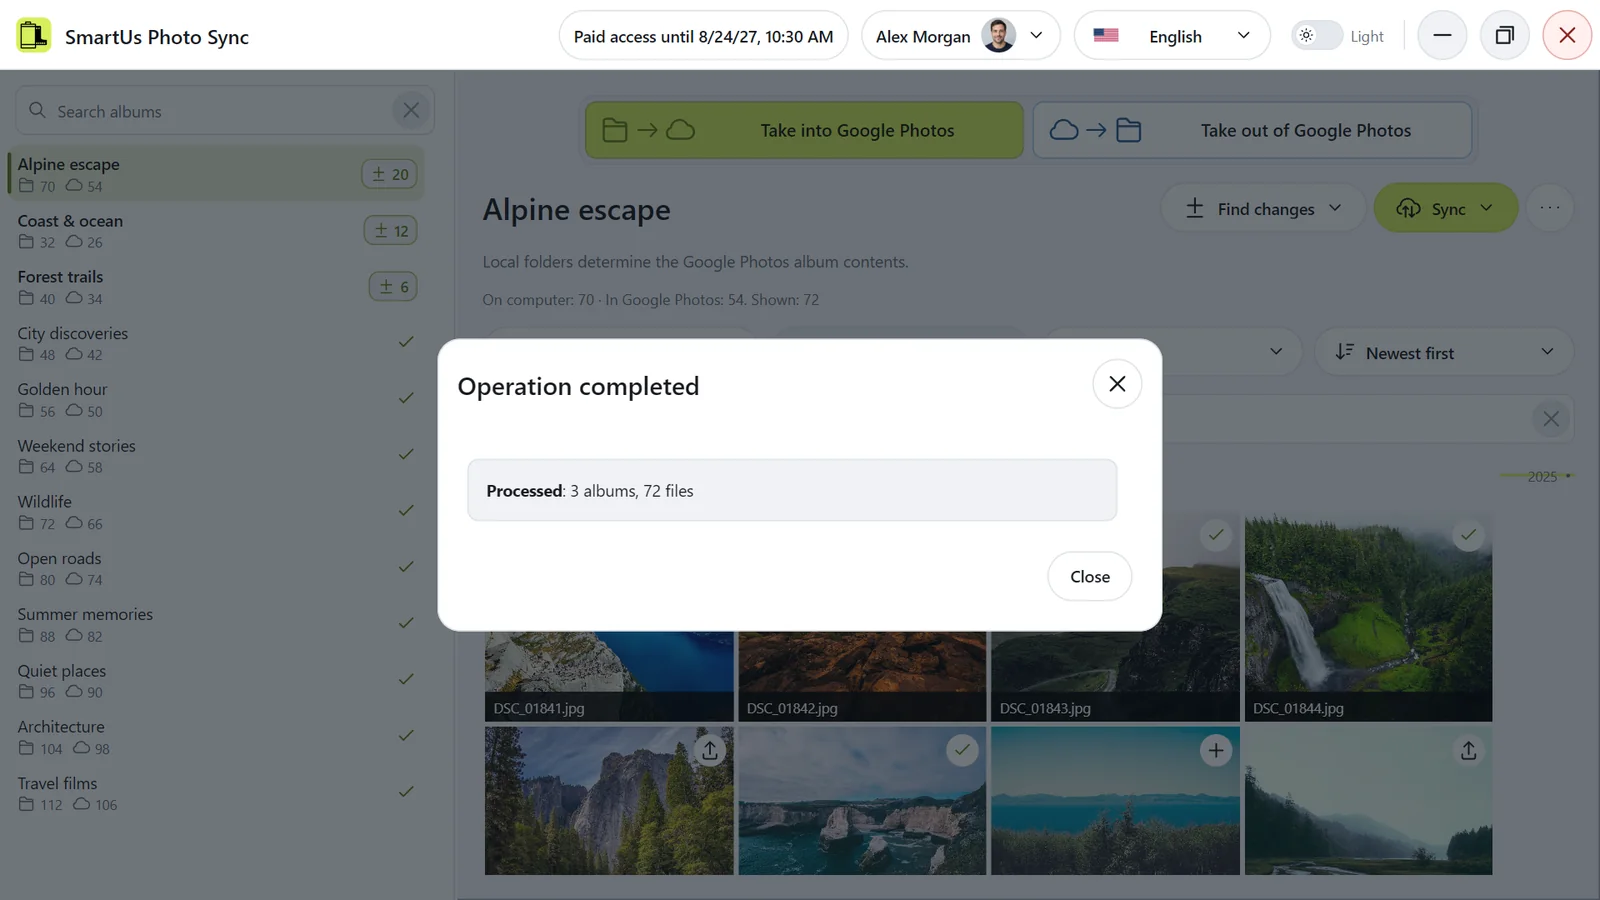
When an operation ends, a short report opens: Operation completed, Operation cancelled or Operation stopped.

After finding changes

The report shows processed albums and files, followed by total planned changes in albums and in files, including zero totals. The totals cover the area chosen when finding changes: the whole catalog or just the selected album. Their sum matches the change badges within that area; plans from other albums are excluded, including after cancellation or an error. An error line appears only if at least one album or file had an error. When a numeric volume is available, the last line shows the detected volume of the selected area, including after cancellation or an error. Identical confirmed files count once across albums and both sides. “At least” means that some data is still unknown, so the displayed volume is a lower bound. If no numeric volume is available, that line is hidden.

Report after finding changes, including the total detected catalog volume.
Report after finding changes, including the total detected catalog volume. Illustration of the application with demonstration data.

After synchronization

The short report after synchronization.
The short report after synchronization. Illustration of the application with demonstration data.
  • The first line shows how many albums and files were processed.
  • If any albums or files had errors, an additional line shows how many. With no errors, that line is hidden. The affected albums and files are marked with a small red triangle; its tooltip explains the cause.
  • The processed count remains visible after success, cancellation or an error, including zero. Synchronization reports show no change totals or volume.
  • Operation stopped means that a general problem, for example a lost connection, stopped the operation. The reason is shown alongside the statistics.

In a report after finding changes, replacing a file with a new version counts as two changes, one addition and one removal.

The report is shown once, after the operation ends. You can always click Find changes to see the current state again.

After an interruption or an uncertain result

After Cancel, a lost internet connection or an error:

  1. Read the reason in the report.
  2. If the application asks you to connect Google Photos again, do so on the welcome screen.
  3. If an album or file asks you to run Find changes because the plan is outdated or a result is uncertain, do so and review the new plan.
  4. If the current plan is kept, click Sync again to apply its remaining changes.

Completed changes are kept; the application does not repeat them. A new Find changes checks what really happened and plans only what is still needed.

Confirmed trial file changes stay counted after an error or Cancel.

How changes are applied

Renamed or empty folders and albums

You renamed a folder on the computer

Click Find changes. When the application recognizes that it is the same folder, it keeps the connection with its album. In Take into Google Photos, synchronization renames the same album in Google Photos; no new album is created and nothing is uploaded again. In Take out of Google Photos, the folder gets the album’s name back.

You renamed an album in Google Photos

In Take out of Google Photos, synchronization renames the matching folder. In Take into Google Photos, the album gets the folder’s name back.

Upper and lower case

Names are compared without regard to case. Changing only the case, for example “trip” to “Trip”, renames the same album or folder.

An empty folder

An empty folder is an album too. In Take into Google Photos, if you have no album with that name, synchronization creates an empty album.

Renamed, edited, duplicate or moved files

The application recognizes files by their content, not by their names.

  • Only the name changed: nothing is uploaded or downloaded again. The file keeps its old name in Google Photos.
  • The content changed (for example, you edited a photo): in Take into Google Photos, the new version is added to the album, and the old version is removed from the album only after that. The old version stays in your Google Photos library.
  • Identical copies: each copy is shown in the grid, but Google Photos keeps one file. Deleting one copy does not remove the file from the album while another identical copy remains in the folder.
  • Moved to another album folder: the file is added to the new album and removed from the old one, without uploading it again. Each album is planned on its own, so synchronize both of them, for example with Sync entire catalog.

In Take out of Google Photos, a file edited on your computer no longer matches the album: synchronization deletes the edited file and downloads the original from the album again. Edit copies outside the main folder, or upload your edits first.

The application does not clean duplicates in your whole Google Photos library.

Deleted or hidden files and folders

In Take into Google Photos

  • A file was deleted or made hidden inside a folder: synchronization removes it from the album. The file stays in your Google Photos library.
  • A folder inside the main folder was deleted or made hidden: finding changes plans to delete its album. Synchronization deletes the album; its photos and videos stay in your Google Photos library.

In Take out of Google Photos

  • A file was deleted from a folder: it is still in the album, so synchronization downloads it again.
  • A folder was deleted: synchronization creates it again and downloads its album.

To remove photos from your folders for good in this direction, remove them from the album in Google Photos first.

Unavailable is not deleted

A disconnected drive or an unavailable folder is not a deletion. See The main folder or a drive is unavailable.

Everything appears in the plan first and happens only after Sync and your confirmation. If you restore a deleted folder or file before synchronizing, the old plan becomes outdated: click Find changes again.

Changes in Google Photos and albums with the same name

What happens to changes made directly in Google Photos depends on the direction.

You added a photo to an album in Google Photos

  • In Take out of Google Photos, it is downloaded into the album’s folder.
  • In Take into Google Photos, the folder decides: if the photo is not in the folder, it is removed from the album and stays in your Google Photos library.

You removed a photo from an album or deleted an album

  • In Take out of Google Photos, the photo is deleted from the folder; when an album is deleted, its folder is deleted too.
  • In Take into Google Photos, the photo is added to the album again; a deleted album is created again and filled from the folder, reusing photos already in your Google Photos.

Several albums with the same name

The application links the folder with the first of your albums with that name and keeps using it. You can rename the other albums in Google Photos to keep names unique.

Albums and photos shared with you by other people are never used. If you have no album of your own with that name, a new one is created in Take into Google Photos.

Missing files, albums or thumbnails

A file missing from the grid usually means it is hidden by the current view.

  1. Select the right album on the left. Clear Search albums with ×.
  2. Set File filter and File type to All files and clear Search files.
  3. Compare On computer, In Google Photos and Shown.
  4. Check the Google account: click your name in the header, then Show library in Google Photos. For one album, Details also offers Show album in Google Photos.

A photo is not in an album or was not downloaded

Removing a file from an album keeps it in your Google Photos library. One photo can be in several albums. In Take out of Google Photos, only photos and videos that are in your own albums are downloaded.

A thumbnail is not shown

If a preview cannot be made, a format icon is shown instead. The file is not damaged and is still synchronized.

Viewing photos and videos

View photos

  1. Select an album and find the file in the grid.
  2. Click the file once to open it.
  3. Use Previous file and Next file, or the left and right arrow keys, to move between files.
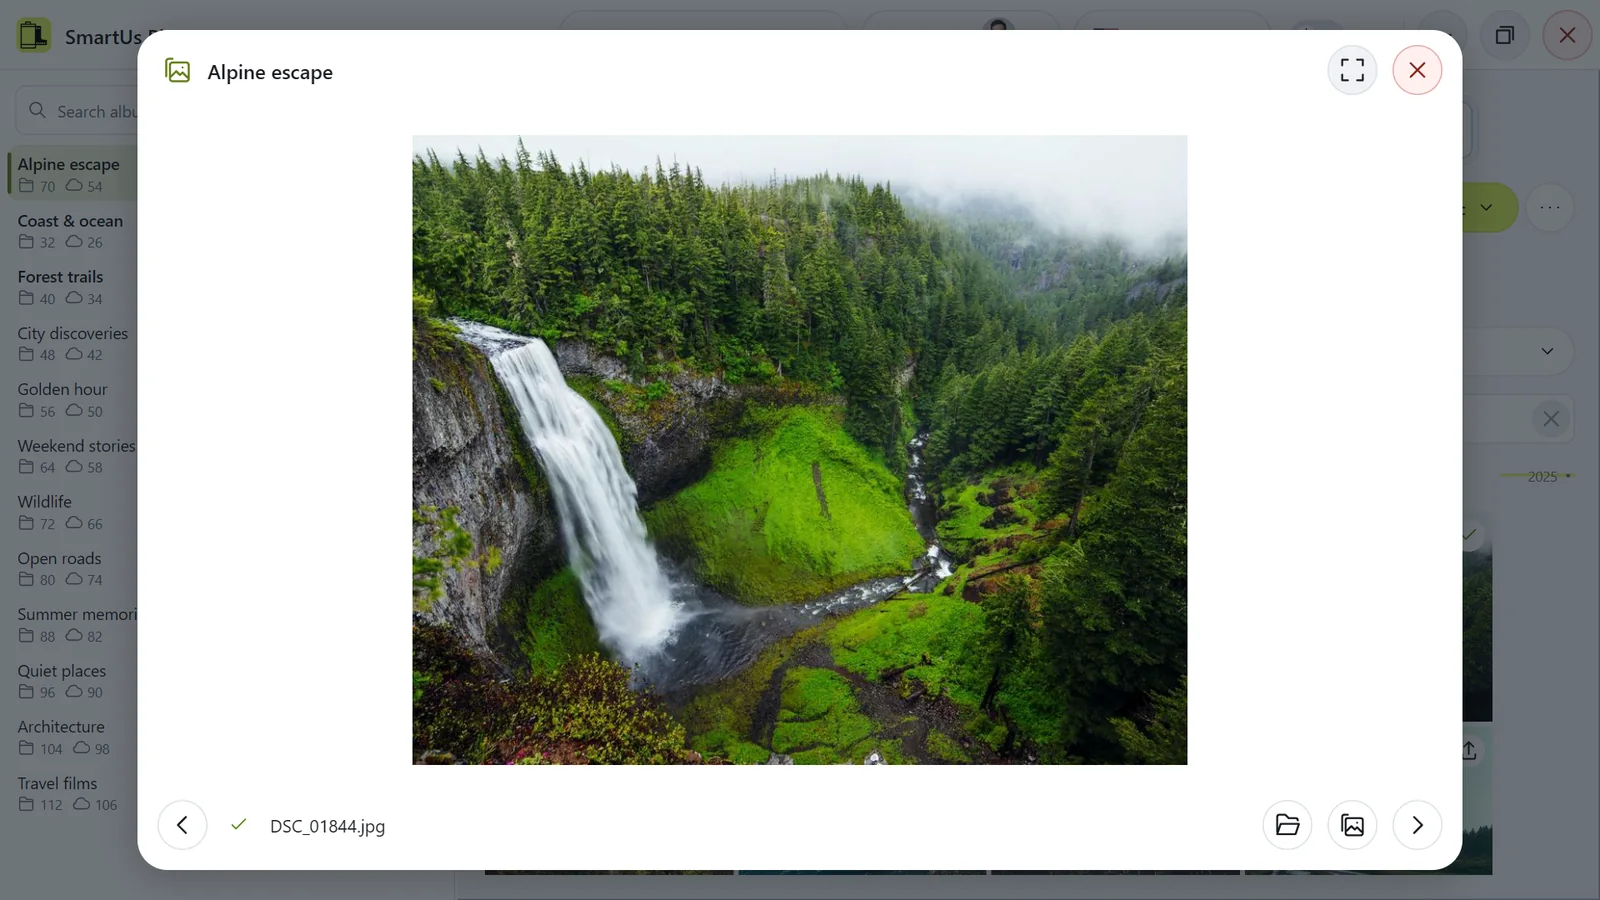
The photo viewer.
The photo viewer. Illustration of the application with demonstration data.
  • Full screen in the viewer header (or a double click on that header) shows the photo in full screen; Restore returns to the normal size.
  • Escape leaves full screen first, then closes the viewer. Close closes it directly.
  • Show photo in Google Photos opens the photo in Google Photos when it is there. The folder button shows the file on your computer.

The viewer follows the current filters and sorting and stays within the same album. Viewing never changes files or the plan.

Play videos

  1. Open a video that is on your computer.
  2. Click Play. A video does not start by itself.
  3. Use Pause, Stop, Mute, Unmute and Volume. Drag Seek to move within the video.
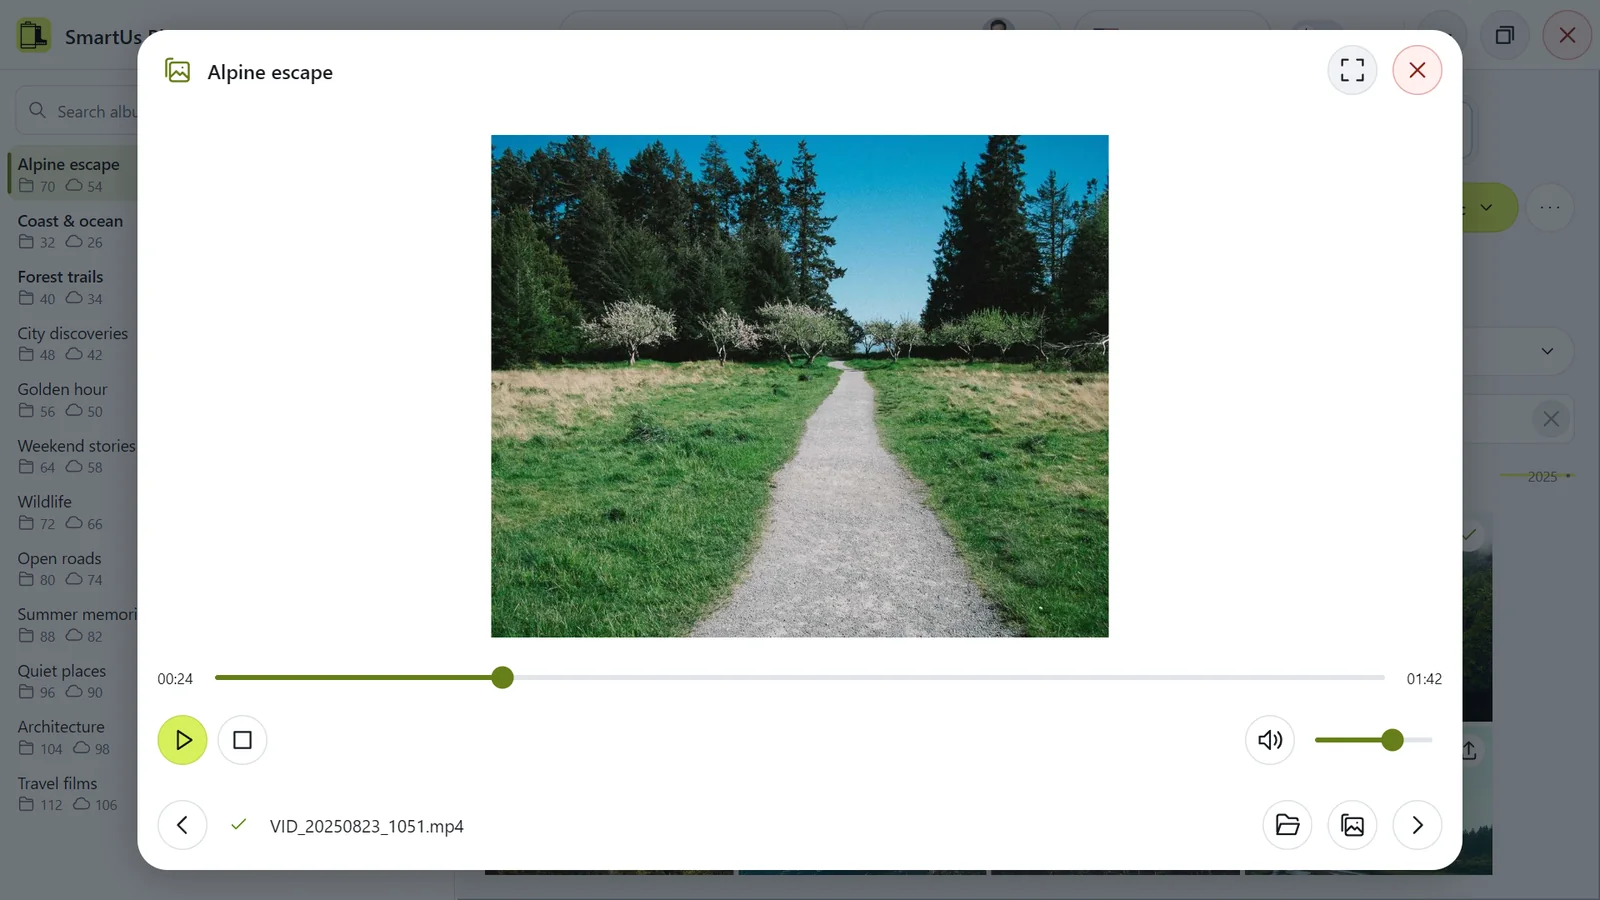
The built-in video player.
The built-in video player. Illustration of the application with demonstration data.

Space plays or pauses. Closing the viewer, moving to another file or minimizing the application stops or pauses playback.

The video does not play

  • The video is only in Google Photos: use Show video in Google Photos, or download its album with Take out of Google Photos to play it on your computer.
  • Unsupported format: the built-in player cannot play this format. Synchronization is not affected.

Problems and error messages

Why does the installer pause for several minutes?

During the first installation, file copying can appear to pause at compiler-run while Windows installs a required runtime component. This stage can take a few minutes.

If there is no error

Leave the installer open and wait a few minutes. Do not cancel the installation or launch a second copy. When the progress bar moves again, follow the remaining installation steps.

Illustration of the installer while Windows installs a required component.

Why this can happen

On a new Windows installation, required components may not be present yet. Windows installs them before the application can run.

A known issue in some versions of Windows Sandbox with Smart App Control can make this step unusually slow. The cause on other computers can differ.

For the full installation steps, see Install the application on Windows.

Empty, too large or rejected files

  • Empty file: the file has no content (0 bytes) and cannot be synchronized.
  • Photo larger than 200 MB or video larger than 20 GB: Google Photos does not accept files this large. The application cannot shrink or convert files.
  • A file or folder cannot be read: check that it is still on your computer and that you have permission to open it, then click Find changes again.
  • File name too long: shorten the name on your computer, then run Find changes again.
  • Google Photos refused a change or an album is unavailable: check which Google account is connected (your name in the application header). Then click Find changes again and review the new plan.
  • The original could not be downloaded: completed files are kept, and the next Sync downloads this file again from the beginning. Check your internet connection.
  • The downloaded file differs from the original: it was not saved. Run Sync again.
  • A local file or folder cannot be written: check permissions and free disk space, and whether another program is using the file.
  • The folder contains unrelated or hidden items: they were kept, and the folder was not deleted.

Buying or changing access does not fix these messages.

Website sign-in or page problems

You cannot sign in or your lists are empty

  1. Accept the necessary cookies notice.
  2. Click Sign in and choose the Google account you signed in with before.
  3. In My access or Computers, set the filter to All.

Inactive access purchases and registered computers remain in your account. If the wrong account is open, sign out and sign in with the right one.

A page does not load or a button does nothing

Reload the page once. If you are asked to wait before trying again, wait a little. If prices cannot be loaded, the payment service may be temporarily unavailable; try later.

Never repeat a purchase to test a problem.

Trial and access

How the free trial works

The free trial lasts 7 days with up to 500 confirmed file changes over the whole trial, in both directions: uploads, downloads, additions to and removals from albums, and deletions of local files. Photos and videos count the same. Uploading a file and adding it to its album counts once. Choosing the main folder, finding changes and album changes do not use the quota.

Start it directly on the website with Start free trial when registering a new computer. No card or Paddle checkout is required. One trial per physical computer: another account or reinstall does not give a new trial.

The trial ends automatically. It never becomes paid access and cannot be repeated or transferred. To continue after expiry or after using its file limit, buy paid access.

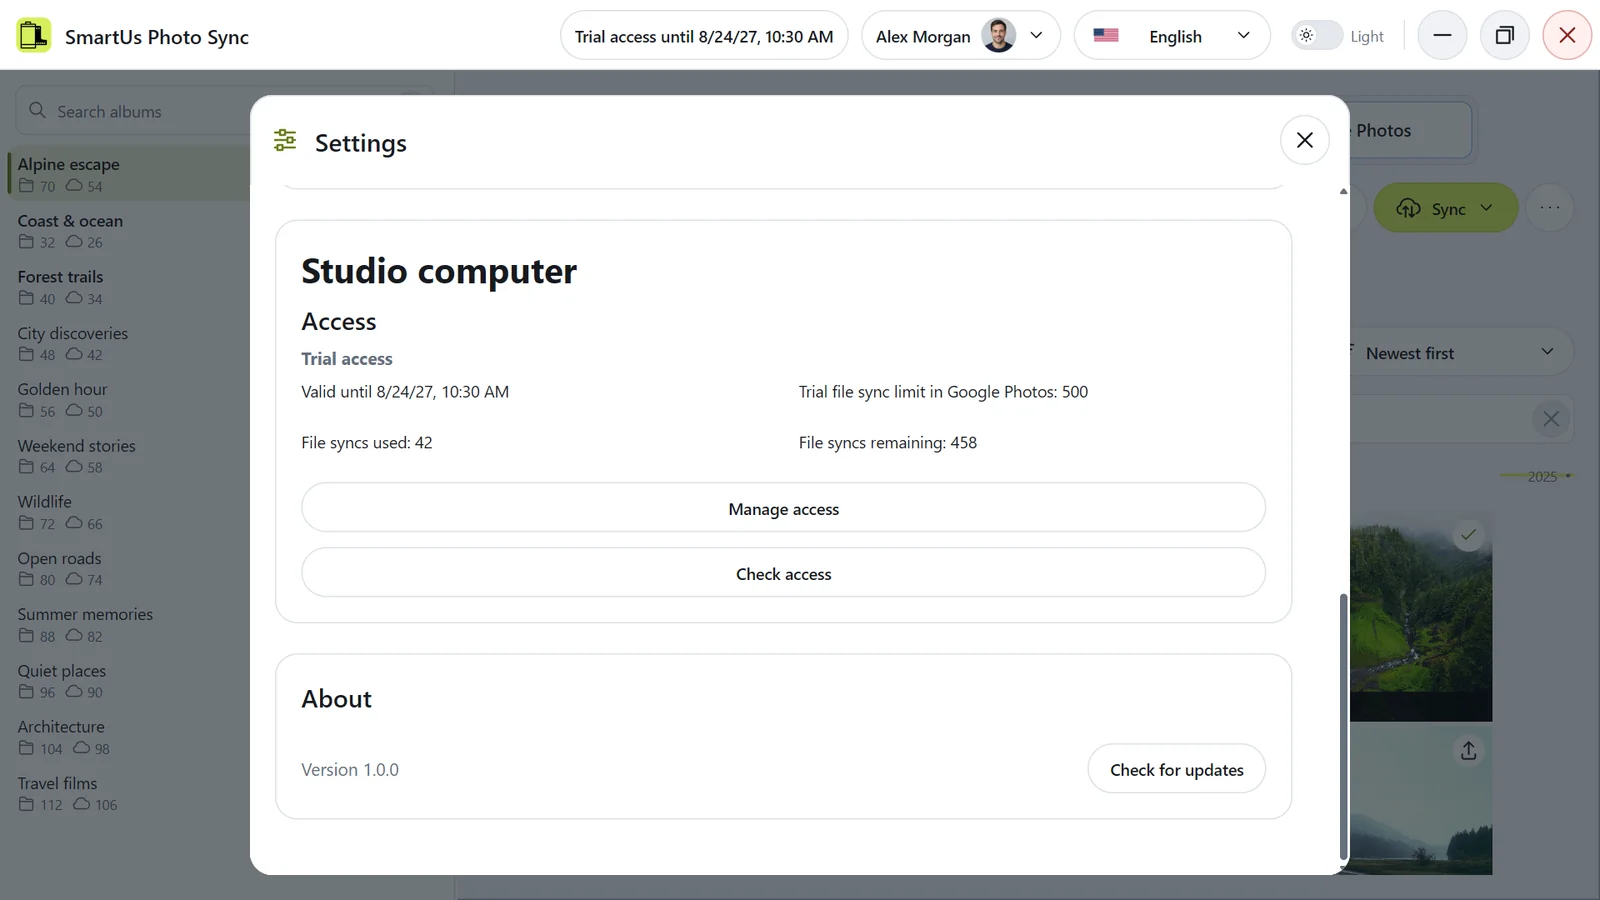
In the application, open Settings > Access and click Check access to see the computer’s remaining trial allowance.

Settings: the trial file sync limit of this computer.
Settings: the trial file sync limit of this computer. Illustration of the application with demonstration data.

Buy access or start a free trial

  1. In the application, open Settings > Access and click Manage access.
  2. Sign in to the website with Sign in.
  3. In My access, select Start free trial or Buy 30 days of access, then Continue to computer.
  4. For a new computer, paste its code from Copy computer code into Code from the application. When buying paid access, choose Access for a new computer, or Access for an already registered computer to select one of your computers without active access. If no suitable computer is available, only the code field appears.
  5. For a trial, confirm Start free trial: it starts on the website without payment. For paid access, click Continue to payment, then Open payment in Paddle; review the amount and taxes in Paddle and pay.
  6. In the application, click Check access.
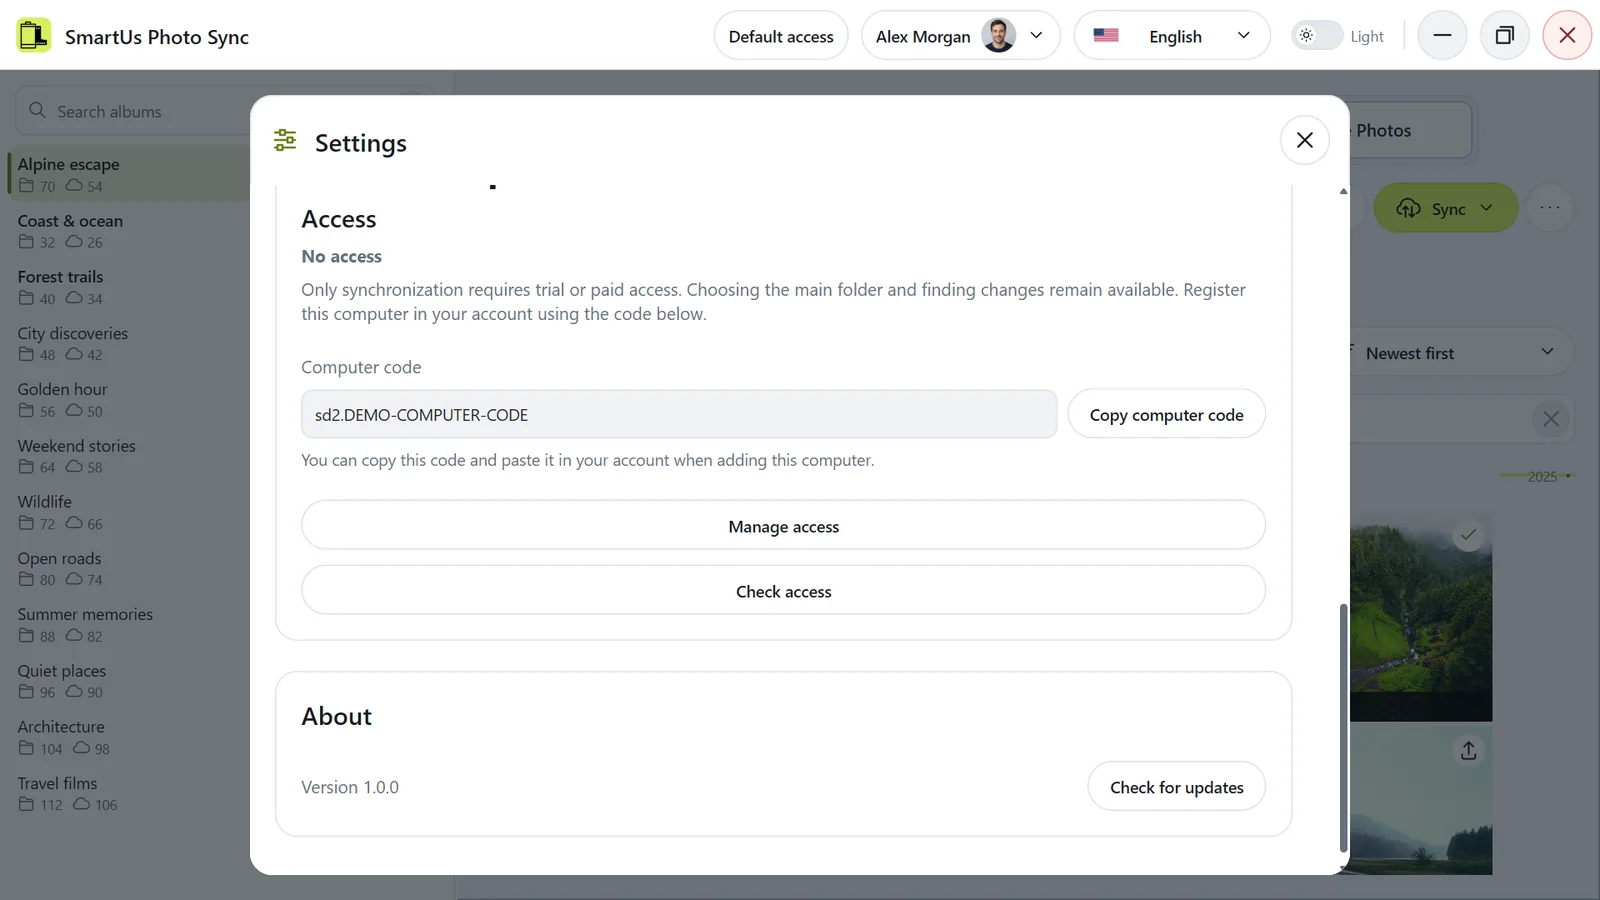
Settings: the code of a computer that is not registered yet.
Settings: the code of a computer that is not registered yet. Illustration of the application with demonstration data.

Paid access is USD 9.99 for 30 days, as a one-time purchase for one computer, for both directions. It begins when payment is confirmed. A checkout success screen alone does not grant access.

If this computer already has access, start the new purchase from its computer details page. The purchase replaces the remaining time with a new period that starts on the purchase date. The time is not added; the website asks you to confirm this before payment.

New purchases are paused

Sometimes we may pause or stop new purchases and free trials. Your account then shows a notice. Pausing or stopping new purchases does not change the expiry date of access already purchased.

Access duration and buying again

The current offer is USD 9.99 for 30 days per computer. Applicable taxes are shown in Paddle before payment.

There is no subscription or automatic renewal. When access expires, synchronization requires a new purchase. Other application features remain available.

Buying again while access is active starts a new period from the new purchase; unused time is not added. Transferring access keeps its original expiry date.

The price, duration and trial limit shown now apply to new purchases or trials. Later changes do not change access already purchased or a trial already started.

Unfinished purchase or waiting for confirmation

If you started a purchase and did not finish it, or the website is still waiting for Paddle’s confirmation:

  1. Open My access: an unfinished purchase is listed under Unfinished orders. You can also find it on the page of that computer: Computers > View computer details.
  2. If Continue payment is shown, click it, then Open payment in Paddle.
  3. If it is not shown, the website is waiting for confirmation: reload the page a little later.

Do not start a second purchase while the first one is unconfirmed. If you are not sure whether you were charged, check Paddle’s confirmation email before paying again.

Computers and your account

The computer code

To start a trial, buy access or transfer it to a new computer, the website needs that computer’s code.

  1. On that computer, open the application, click your name in the header, then Settings.
  2. Scroll to Access and click Copy computer code.
  3. Paste the whole code into Code from the application on the website.
Settings: the code of a computer that is not registered yet.
Settings: the code of a computer that is not registered yet. Illustration of the application with demonstration data.

The shortened Registration code on the website is only for display. Keep the code private: do not share it publicly.

A computer is recognized by its hardware, so a new code of the same computer does not create a new computer and does not give a new trial.

Transfer paid access to another computer

  1. On the website, open My access > View access details for active paid access.
  2. Click Transfer and choose your computer, or Add a new computer and paste its code.
  3. Read the warning and confirm. If the receiving computer has a trial, explicitly confirm ending it.
  4. On the receiving computer, click Check access.

The previous computer loses synchronization access only when the transfer succeeds. No payment or extra time is added; the original expiry remains unchanged.

A trial cannot be transferred. A receiving computer with active paid access cannot be selected. Computer ownership and used trial allowances stay recorded.

Computer name, owner account and deletion

Rename a computer

  1. On the website, open Computers > View computer details.
  2. Click the pencil button Rename, enter the name and click Confirm.
  3. In the application, click Check access to see the new name.

The computer is registered in another account

A computer stays with the website account where it was first registered. Expiry of access, a new code or a transfer does not release it. Sign in with that account; if you lost access to that Google account, use Google account recovery.

Can I delete a computer?

No. Registered computers remain in your account and cannot be deleted or handed to another account. A previously registered computer cannot get another trial.

Privacy and security

What happens to my photos and data

  • When synchronizing, your photos and videos travel directly between your computer and your Google Photos: uploads go from your computer to Google, and downloads come from Google to your computer. The application never sends them to the SmartUs Photo Sync website.
  • Your Google Photos sign-in is stored only on your computer, in the application’s own browser profile, together with the account details the application shows (identifier, email, name and profile picture link). The website never receives your password, cookies or sign-in data.
  • Your library (the main folder, file information, plans and thumbnails) is stored only on your computer.

The website receives the information needed for your account and access purchases:

  • your website account: Google account identifier, name, email and profile picture link;
  • your computers: a one-way hash of the computer’s hardware identifier (not the identifier itself), a verification key, the encrypted registration code, the computer name from the operating system, the operating system type and the date the record was created;
  • access and purchases: status, dates, assigned computer, the price, currency and duration of purchases, and the number of confirmed file changes counted during the trial.

If you use the private help form, we also receive the request type, subject, message and the names and contents of any files you select. They are sent to SmartUs Labs support by email; files are included as email attachments. Nothing is attached automatically.

Card details are handled by Paddle, the seller for payments; SmartUs Labs does not store them.

Details are in the Privacy Policy.

Access, correction or deletion of your data

You can ask to access, correct or delete your data, to restrict its processing or to receive a copy, and you can object to processing.

  1. Sign in to your account on the website.
  2. Open Get help and choose Privacy questions.
  3. Enter Subject and describe what you are asking for in Message. Both text fields are required.
  4. Optionally select supporting files, then send the request.

You can attach screenshots or other files: up to 5 files, 10 MB in total. They are delivered as email attachments with your request. No files are sent automatically.

Your verified account name and email are included automatically; you do not need to enter them again. The private form delivers your request to SmartUs Labs support by email.

Expiry of access does not delete your account, computers or recorded trial usage. Disconnecting the Google account in the application deletes the saved sign-in from your computer. See the Privacy Policy.

Payments, refunds and terms

Payments, invoices and refunds

Paddle, an online payments company, is the official seller (merchant of record) of access to SmartUs Photo Sync: you pay Paddle, and Paddle processes the payment, issues invoices and handles taxes under its buyer terms. Questions about a charge, an invoice or a payment method are answered by Paddle buyer support.

Refunds

We do not provide refunds after access is purchased, under any circumstances. The free trial is there so you can check the application and its features before you buy.

If you still want to request a refund, contact Paddle buyer support: as the seller, Paddle handles such requests under its refund policy.

The full rules are in the Terms of Use.

Service availability and the rules

Can new purchases stop or the service close?

We do not guarantee uninterrupted or error-free operation of the service, including the application. We may pause or stop new purchases and free trials at any time; this does not change the expiry date of access already purchased.

We may decide at any time to permanently close the service and stop new sales. The closure itself takes place only after all previously paid access periods have ended. When the service is permanently closed, we delete all users’ personal data stored on our side, and the application’s support channels stop working.

What if Google changes access?

The application can stop working if Google changes its rules or the ways Google Photos can be accessed, including during a paid access period. Paid access is not refunded in this case either; see Payments, invoices and refunds.

Synchronization is temporarily unavailable

If the application shows Access to paid features disabled by administrator, we have temporarily turned off synchronization for all computers. Choosing the main folder, browsing and finding changes keep working. Your purchases and their expiry dates stay the same: the time synchronization was off is not added. Synchronization works again once we turn it back on, if your access is still valid.

What is not allowed

  • hacking or attacking any part of the service;
  • bypassing security, access or trial restrictions;
  • unlawful use or intentional harm to the service or its users;
  • infringing copyright in the service or in other people’s content.

Violations may lead to suspended or terminated access or a blocked account, without a refund.

Before synchronizing

Review the plan, especially removals and deletions, and keep backups of your original files. You use the service at your own risk under the Terms; mandatory consumer rights remain.

Getting help

Getting help

These questions and answers explain how to use the application, the website and access. Use the search at the top: it understands all six of our languages.

Report a technical problem

The Technical problem category is available only if this website account has or has ever had trial or paid access. Expired, revoked or exhausted access still qualifies. An unpaid pending order alone does not qualify.

  1. Sign in and open the private form in your account under Get help.
  2. Choose Technical problem.
  3. Enter Subject, describe the problem in Message and send the request. You can attach files if needed.

Payments and refunds

Questions about a charge, an invoice, taxes or a refund are answered by Paddle buyer support. You manage your access and computers in your account on the website.

Questions about your personal data

Every signed-in account can send questions and requests about personal data through the private form in your account: open Get help and choose Privacy questions. Trial or paid access is not required for these requests. See Access, correction or deletion of your data.